< | Module 2 lab index | Next lab day >
Introduction
Last time you used the lactose-analogue IPTG to induce expression of inverse pericam in BL21(DE3) bacteria. Today you will isolate IPC from the bacteria, and you will begin characterizing your wild-type and mutant proteins.
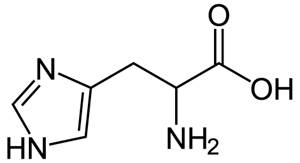
We can take several measures to ensure that a high quantity of plasmid-encoded protein is produced by our bacteria, such as using a high-copy plasmid. However, the bacteria in which we grow the protein clearly need to produce other proteins merely to survive. The bacterial expression vector we are using (pRSET) contains six Histidine residues downstream of a bacterial promoter and in-frame with a start codon. Our resultant protein is therefore marked by the presence of these residues, or His-tagged. Histidine has several interesting properties, notably its near-neutral pKa, and His-rich peptides are promiscuous binders, particularly to metals. (For example, histidine side chains help coordinate iron molecules in hemoglobin.)

Affinity separation process. Green represents Nickel, blue the (His-tagged) protein of interest, and orange the other proteins in the cell extract.
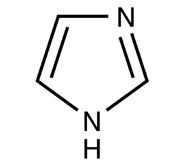
Today we will use a Nickel-agarose resin to separate our protein of interest from the other proteins present in the bacteria. The His-tagged protein will preferentially bind to the Nickel-coated beads, while irrelevant proteins can be washed away. Finally, a high concentration of imidazole (which is the side chain of histidine) can be used to elute the His-tagged inverse pericam by competition. Due to the inherent fragility of IPC, we will add several components to our protein extraction and purification reagents: bovine serum albumin (BSA), which is a protein stabilizer, and a cocktail of protease inhibitors.


Histidine and its side chain imidazole. (Images: public domain.)
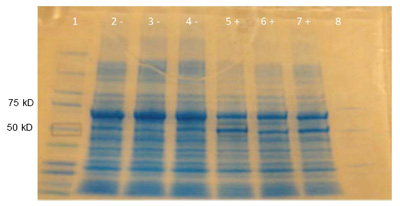
Prior to purifying our protein, we will lyse the bacteria, and run whole bacterial extracts on a protein gel. This procedure is called SDS-PAGE, for sodium docecyl sulfate-polyacrylamide gel electrophoresis. SDS is an ionic surfactant (or detergent), which denatures the proteins and coats them with a negative charge. Since denatured proteins are linear, they will move through the gel at a speed inversely proportional to their molecular weight, just like DNA on agarose gels. (Non-denatured proteins run according to their molecular weight, shape, and charge.) As we did with DNA gels, we will run a reference ladder containing proteins of known molecular weight and amount. When running –IPTG and +IPTG samples side-by-side, you should see the emergence of a protein band at the expected molecular weight for inverse pericam, which may be very faint or non-existent in the control sample, but bright and thick in the induced sample. To visualize all the proteins released by the bacteria, you will stain the gels with Coomassie Brilliant Blue (actually, a variant called BioSafe Coomassie). This is a non-specific stain for all proteins. In a technique called Western Blotting, SDS-PAGE is combined with the use of antibodies to preferentially stain a single protein.
After purifying inverse pericam from your bacterial lysates, you will measure the protein concentration by the Bradford colorimetric assay, named after the scientist who first published it (Bradford, 1976). The dye used in this assay is the same one you will use to stain your protein gels – Coomassie. In acidic solution, Coomassie normally has an absorbance peak at ~ 465 nm (blue light), but this peak is shifted to 595 nm (orange light) upon binding to protein. Protein binding occurs primarily via arginine, as well as other basic and aromatic residues (Compton and Jones, 1985). The concentration of protein present in a sample is thus proportional to the 595 nm absorbance peak, and its absolute value can be determined using a standard curve of reference protein. We do not have a sample of inverse pericam with a known quantity of protein, so today we will use BSA as a reference protein. Because the compositions of IPC and BSA with respect to arginine may vary, this assay will really only give the relative concentrations of your protein samples, and the absolute concentrations will have an associated error.
References
Bradford, M. M. “A Rapid and Sensitive Method for the Quantitation of Microgram Quantities of Protein Utilizing the Principle of Protein-Dye Binding.” Anal Biochem 72, no. 1-2 (May 7, 1976): 248-54.
Compton, S. J., and C. G. Jones. “Mechanism of Dye Response and Interference in the Bradford Protein Assay.” Anal Biochem 151, no. 2 (December, 1985)
Protocols
Part 1: Lysis of Cells Producing Wild-type and Mutant IPC
- You will be given an aliquot of room temperature BPER (bacterial protein extraction reagent), which also contains 0.1% bovine serum albumin (BSA, a stabilizer), and a protease inhibitor cocktail to guard against protein degradation. When you are ready to begin, add 1:1000 of cold lysing enzyme mixture (obtained from teaching staff) to the BPER solution.
- Per cell pellet (6 total), add the appropriate volume of enzyme-containing BPER and resuspend by pipetting until the solution is relatively homogeneous.
- Resuspend -IPTG samples in 300 µL, and +IPTG samples in 600 µL - do you remember why?
- Vortex for 30-60 seconds.
- Incubate the solutions (at room temperature) for 3 min.
- Finally, spin for 3 min. at maximum speed and transfer supernatants to fresh tubes.
Part 2: SDS-PAGE of Protein Extracts
- Last time you measured the amount of cells in each of your samples. (If you ran cultures overnight, the teaching faculty measured the +IPTG samples for you and posted the results.) Look back at your measurements, and find the sample with the lowest cell concentration. Set aside 15 µL of this sample for PAGE analysis in an eppendorf.
- For your other five samples, you should take the amount of bacterial lysate corresponding to the same number of cells as the lowest concentration sample. For example, if the OD600 of your WT -IPTG sample was 0.05, and the OD600 of your WT +IPTG sample was 0.30, you would take 15 µL of the -IPTG, but only 2.5 µL of the +IPTG sample.
- Next, add enough water so the each sample has 15 µL of liquid in it. You might use the table below to guide your work.
| SAMPLE/LANE # | SAMPLE NAME | OD600 | SAMPLE VOLUME (µL) | WATER VOLUME (µL) | LOADING VOLUME (µL) |
|---|---|---|---|---|---|
| 0 | pre-stained ladder | -– | -– | -– | 10 |
| 1 | 25 | ||||
| 2 | 25 | ||||
| 3 | 25 | ||||
| 4 | 25 | ||||
| 5 | 25 | ||||
| 6 | 25 | ||||
| 7 | Unstained ladder | -– | -– | -– | 10 |
- Now add 15 µL of 2X sample buffer to 15 µL of each of your diluted lysates. Also retrieve 15 µL samples of MW markers from the teaching faculty.
- The pre-stained marker (lane 0) will be used to track the progress of the gel.
- The unstained marker (lane 7) contains a known amount of protein per band, and will be used to estimate the gross protein contents of your samples.
- Boil all eight eppendorfs for 5 minutes in the water bath that is in the fume hood.
- You will be shown by the teaching faculty how to load your samples into the gel. You might load your samples according to the table above.
- Note the starting and stopping time of electrophoresis, which will be initiated by the teaching faculty at 200 V, and run for 30-45 minutes.
- Pry apart the plates using a spatula, and carefully transfer your gel to a staining box. Add 200 mL of deonized water and rinse the gel for 5 min.
- Repeat the rinse two more times with fresh water (200 mL and 5 min incubation each time).
- Add 50 mL of BioSafe Coomassie, and incubate for at least 1 hour.
- Empty the staining solution into the waste container in the fume hood - careful not to lose your gel!
- Add 200 mL of water to your stained gel. Replace with fresh water just before leaving the lab if you have a chance.
- Tomorrow, the teaching staff will transfer each gel to fresh water, then photograph them and post the results to the wiki. You will have a chance to physically observe your gels next time.

Sample gel result: IPC and mutant protein expression. Cells were treated with (+) or without (-) IPTG to induce IPC expression in (+) samples, and then run on and SDS-PAGE. Lane 1: Kaleidoscope stained marker. Lanes 2 and 5: Wild type IPC (-) (+). Lanes 3 and 6: M124S (-) (+). Lane 4 and 7: E84G (-) (+). Lane 8: Unstained marker. Both wildtype and mutant proteins were expected to be 50.7 kD. All samples showed a dark band around 70 kD, mostly likely the BSA added to the cell lysis cocktail. (Photo and caption courtesy of anonymous MIT student. Used with permission.)
Part 3: Protein Purification
You will process three samples (the three +IPTG extracts) according to the following procedure. You should either time your spins with another group, or balance your tubes with 3-way symmetry. Keep all buffers on ice when not in use. All spins should be performed at 1000 rcf for 1 min.
- The following buffers have been prepared for you:
- Binding Buffer (0.5 M NaCl, 20 mM Tris-HCl, 5 mM imidazole, pH 7.9)
- Wash Buffer (0.5 M NaCl, 20 mM Tris-HCl, 60 mM imidazole, pH 7.9)
- Elute Buffer (0.5 M NaCl, 10 mM Tris-HCl, 1 M imidazole, pH 7.9)
- Each buffer contains protease inhibitors to help keep your protein intact.
- Gently rock the nickel-agarose resin to fully resuspend it, then distribute 400 µL of slurry to each of three tubes.
- The agarose beads in the resin were pre-charged with a nickel ion solution.
- Label each tube as wild-type or mutant, then spin for 1 min. at low speed.
- Remove the 200 µL of supernatant from the resin and add it to your waste collection tube. The damp, semi-solid resin left behind should be ~ 200 µL “tall.”
- First you must rinse the resin. Add 400 µL of sterile DI water to each tube. Place on the nutator for 15-60 seconds to mix, or simply invert the tube several times. Flick the tube to complete resuspension of the resin if necessary.
- Spin for 1 min., then pipet off and discard the entire supernatant (400 µL).
- Repeat steps 5 and 6 for the following buffers
- a second wash with DI water
- 2 washes with Binding Buffer, 400 µL each time
- Add your entire cell extract to the resin (~550-600 µL). Be sure to add each sample to the appropriately labeled tube!
- Invert to mix the three samples as usual, then place on the nutator for 5 min. Spin and discard supernatants as before.
- Now you will again repeat steps 5 and 6, to wash away contaminants:
- 3 washes with Binding Buffer, 600 µL each time
- 2 washes with Wash Buffer, 600 µL each time
- Finally, you will collect your protein. Add 500 µL of Elute Buffer, resuspend and spin as usual. Do not throw away the supernatant! Instead, transfer it to a fresh eppendorf tube, labeled “pure IPC X#Z,” “pure IPC M124S,” or “pure IPC WT.”
- Do not throw away the resin yet either! Instead, add another 500 µL of Elute Buffer, and repeat the step above. Add the second supernatant to the first.
- Immediately after eluting your protein, transfer 10 µL of it to a clean eppendorf tube (for assaying protein concentrations), and add a 1:100 dilution of BSA to the remaining protein (10 µL of BSA for ~ 1 mL of protein).
Part 4: Protein Concentration
- Prepare 12 mL Bradford reagent from the 5x concentrated stock by adding water.
- Obtain BSA standards from the teaching faculty. The standards were prepared in elution buffer, since imidazole has some absorbance at 595 nm.
- Each tube already contains exactly 10 µL of standard (or plain elution buffer, for your blank solution).
- Add 1 mL of Bradford reagent to each standard, as well as to your three unknown protein samples. Incubate 10-20 min at room temperature.
- Measure the absorbance of each sample at 595 nm. Work as quickly as you can, because the absorbance will continue to slowly change over time. To get a sense of the error incurred due to the ongoing reaction, measure your blank sample both at the beginning and at the end of your run.
| SAMPLE (mg/mL) | A595 | SAMPLE | A595 |
|---|---|---|---|
| BSA 0.1 | Blank - start | ||
| BSA 0.2 | WT IPC | ||
| BSA 0.4 | Mutant 1 | ||
| BSA 0.6 | Mutant 2 | ||
| BSA 0.8 | Blank - end | ||
| BSA 1.0 | -———- | -———- |
For Next Time
- Next time in lab, only two groups at a time will come to work. Please sign up for a time slot.
- In a sentence or two, explain why the Bradford reagent turns from brown to blue, and not, say, from blue to red. (Hint: what does it mean for a material to appear blue?)
- Write a draft of the methods section (through today’s experiments) to be included in your research article.
- Calculate the approximate protein concentrations for your inverse pericams. First make a standard curve from the BSA data, then perform a linear fit (for example, using the Add Trendline function in Excel). The chart does not have to be especially pretty as it will not go in your report, but please do show your work, starting from the raw data.
- Prepare a schematic that depicts your mutagenesis strategy and write a short caption for it. You might show proposed changes at both the nucleotide and amino acid level for M124S and X#Z.
Reagent List
-
Cell Lysis
- B-PER (Bacterial Protein Extraction Reagent) from Pierce
- Bovine Serum Albumin
- Protease Inibitor Set, EDTA-Free from Calbiochem
- Lysis Enzyme from Epicentre Biotechnologies
-
Gels from Bio-Rad
- 4-15% Polyacrylamide Gels in Tris-HCl
- TGS Buffer (25 mM Tris, 192 mM glycine, 0.1% (w/v) SDS, pH 8.3)
- Kaleidoscope and Unstained markers, Precision Plus
- Laemmli Sample buffer from Bio-Rad
- 2% SDS, 25% glycerol, 0.01% Bromophenol Blue in 62.5 mM Tris-HCl pH 6.8, + 5% β-mercaptoethanol just before use
-
Protein Purification from Novagen/Calbiochem
- His-Bind Purification Kit buffers
- His-Bind Resin, Ni-Charged
-
Protein Concentration
- Bio-Rad Protein Assay (Bradford Reagent)


