Modules: 1.1 | 1.2 | 1.3 | 1.4 | 1.5 | 1.6 | 1.7
Introduction
How many genetically-encoded creatures exist in every milliliter of sea water? 100? 1000? More? It turns out that bacteria are by far the best represented life form, numbering up to a million cells/ml. If each cell is assumed to harbor the DNA content of pedestrian E. coli MG1655, then that means 1012th base pairs of DNA/ml. This thriving gene pool is even more remarkable in light of the fact that each ml of sea water contains approximately 1010th viruses that infect bacteria, aka bacteriophages or “phages” for short. These destroy half the world’s bacterial population every 48 hours [2]. Given the huge number of bacteriophages that exist, it’s probably not surprising that most of the Earth’s bacteriophages are completely uncharacterized, though massive genome sequencing efforts are underway.
A few bacteriophages are exquisitely well characterized. Indeed, the study of phage laid much of the groundwork for our current understanding of genetics and molecular principles in biology. These principles carry over to the biology of more complex cells (Jacques Monod famously said “What is true for Escherichia coli is true for the elephant” [Francois Jacob (1988)]). M13 is a member of the filamentous phage family. It has a long (~900 nm), narrow (~20 nm) protein coat that encases a small (~6.4 Kb) single stranded DNA genome. The genome encodes 11 proteins, five of which are exposed on the phage’s protein coat and six of which are involved in phage maturation inside its E. coli host.
Phage Particles
The phage coat is primarily assembled from a 50 amino acid protein called pVIII (or p8), which is sensibly enough encoded by gene VIII (or g8) in the phage genome. For a wild type M13 particle, it takes about ~2700 copies of p8 to make the ~900 nm long coat. The coat’s dimensions are flexible though and the number of p8 copies adjusts to accommodate the size of the single stranded genome it packages. For example, when the phage genome was mutated to reduce its number of DNA bases (from 6.4 kb to 221 bp) [3], then the p8 coat “shrink wraps” around the reduced genome, decreasing the number of p8 copies to less than 100. Electron micrographs of the resulting “microphage” and its wild type parent are shown below (image courtesy of Esther Bullitt, Boston University School of Medicine), where the black bar in each image is 50 nm long. And what about the upper limit to the length of the phage particle? Anecdotally, viable phage seems to top out at approximately twice the natural DNA content. However, deletion of a phage protein (p3) prevents full escape from the host E. coli, and phages that are 10-20X the normal length with several copies of the phage genome can be seen shedding from the E. coli host (look at the image on the coverpage to this module).
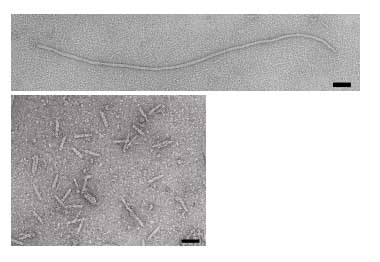
Figure 1. Electron micrographs of microphage described by Specthrie, et al. Source: Specthrie, L., et al. “Construction of a Microphage Variant of Filamentous Bacteriophage.” J Mol Biol 228, no. 3 (December 5, 1992): 720-724. Courtesy of Elsevier, Inc. ScienceDirect. Used with permission.
There are four other proteins on the phage surface, two of which have been extensively studied. At one end of the filament are five copies of the surface exposed pIX (p9) and a more buried companion protein, pVII (p7). If p8 forms the shaft of the phage, p9 and p7 form the “blunt” end that’s seen in the micrographs. These proteins are some of the smallest known (only 33 and 32 amino acids), though some additional residues can be added to the N-terminal portion of each which are then presented on the “outside” of the phage coat (much more on this technique later). At the other end of the phage particle are five copies of the surface exposed pIII (p3) and its less exposed accessory protein, pVI (p6). These form the rounded tip of the phage and are the first proteins to interact with the E. coli host during infection. p3 is also the last point of contact with the host as new phages bud from the bacterial surface.
Phage Life-cycle
The general stages to a viral life cycle are: infection, replication of the viral genome, assembly of new viral particles and then release of the progeny particles from the host. Filamentous phages use a bacterial structure known as the F pilus to infect E. coli, with the M13 p3 tip contacting the TolA protein on the bacterial pilus. The phage genome is then transferred to the cytoplasm of the bacterial cell where resident proteins convert the single stranded DNA genome to a double stranded replicative form (“RF”). This DNA then serves as a template for expression of the phage genes.
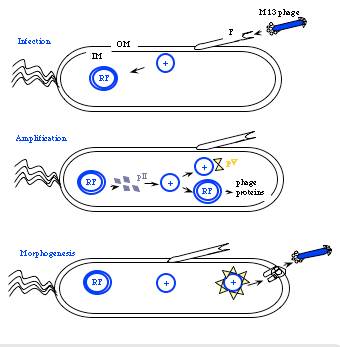
Figure 2. Cartoon of phage life cycle.
Two phage gene products play critical roles in the next stage of the phage life cycle, namely amplification of the genome. pII (aka p2) nicks the double stranded form of the genome to initiate replication of the + strand. Without p2, no replication of the phage genome can occur. Host enzymes copy the replicated + strand, resulting in more copies of double stranded phage DNA. pV (aka p5) competes with double stranded DNA formation by sequestering copies of the + stranded DNA into a protein/DNA complex destined for packaging into new phage particles. Interestingly there is one additional phage-encoded protein, pX (p10), that is important for regulating the number of double stranded genomes in the bacterial host. Without p10 no + strands can accumulate. What’s particularly interesting about p10 is that it’s identical to the C-terminal portion of p2 since the gene for p10 is within the gene for p2 and the protein arises from transcription initiation within gene 2. This makes the manipulation of p10 inextricably linked to manipulation of p2 (an engineering headache) but it also makes for a compact and efficient phage in nature.
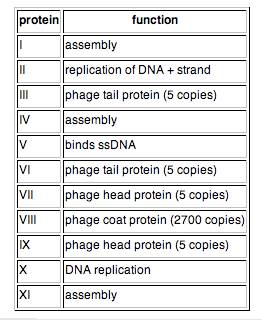
Table 1. M13 protein functions.
Phage maturation requires the phage-encoded proteins pIV (p4), pI (p1) and its translational restart product pXI (p11). Multiple copies (on the order of 12 or 14) of p4 assemble in the outer membrane into a stable, i.e. detergent resistant, barrel-shaped structure. Similarly a handful of the p1 and p11 proteins (5 or 6 copies of each) assemble in the bacterial inner membrane, and genetic evidence suggests C-terminal portions of p1 and p11 interact with the N-terminal portion of p4 in the periplasm. Together the p1, p11, p4 complex forms channels through which mature phage are secreted from the bacterial host.
To initiate phage secretion, two of the minor phage coat proteins, p9 and p7, are thought to interact with the p5-single stranded DNA complex at a region of the DNA called the packaging sequence (aka PS). The p5 proteins covering the single stranded DNA are then replaced by p8 proteins that are embedded in the bacterial membrane and the growing phage filament is threaded through the p1, p11, p4 channel. This replacement of p5 by p8 explains the microphage data presented earlier…making very clear how the size of the phage particle is determined by the number of bases the phage packages. Once the phage DNA has been fully coated with p8, the secretion terminates by adding the p3/p6 cap, and the new phage detaches from the bacterial surface. How long does all this take? Amazingly, new M13 phage particles are secreted within 10 minutes from a newly infected host and can arise at a rate of 1000/cell within the first hour of infection. Also amazing is how the bacterial host can continue to grow and divide, allowing this process to continue indefinitely.
Protocols
As you heard about in lecture, you’ll be starting a project to study the M13 genome and in the process you’ll be learning some fundamental tools and techniques of molecular biology. One major goal we have for this module is to establish good habits for documentation of your work, in your lab notebook and on the wiki. By documenting your work according to the exercises done today, you will
- Be better research students (in 20.109 and in any research lab you may join)
- Be better writers since a clear record of what you’ve done will improve your data analysis
- Be better scientists, since you’ll eventually train others to document things this way too
Today’s lab has four parts. First, you and your partner will complete the lab practical we have set up for you. Second, you and your lab partner will annotate the M13KO7 genome map, identifying trouble spots suitable for re-engineering. Next you will design a pair of oligonucleotides to modify the M13 genome, adding restriction sites to the gene encoding p3. Finally, you will begin to prepare the M13 backbone so next time you can clone the insert oligonucleotides you design today.
Part 1: Lab Practical
Good luck!
Part 2: M13KO7 Renovation
You are about to undertake an ambitious project, namely a major renovation of the M13 genome. If you’re successful, the renovated genome will be a better substrate for further engineering. It will consist of discrete, insulated elements that might, later on, be re-used, tuned and rationally modified with ease. Refining the genome won’t be easy. Nature has optimized the existing phage in response to evolutionary pressures and it will be a lot easier for you to kill it than to improve it. But we have a few powerful resources to draw from: full sequence data is available for the M13 genome and some of its close relatives; clever genetic experiments have defined the functionally relevant parts; structural data gives us a view of the phage particle and its components. Together these provide detailed, though not complete, understanding of the workings of the phage. And the beauty of this experiment is how your genome renovation, once built and tested, will feedback and add to the existing base of knowledge.
Today you will begin your renovation with a detailed evaluation of the natural existence, identifying parts of the genome crying out for re-engineering. Annotate the M13KO7 genome from the printout in the following way.
- Copy the sequence and the numbers associated with each line of sequence into a MSWord document.
- Read just the margins or font size so the lines of sequence are more easily read. Margins should be no smaller than 0.6’ and the font size should be no smaller than 12 point.
- Box the unique BamHI site (GGATCC) that starts at position 2220.
- Use the information printed at the start of your M13KO7 sequence to identify and then draw a box around the start (use a green box) and stop codons (use a red box) for genes I through XI. Codons for the standard genetic code can be found here. You can use the space between lines of code to note which landmark you’ve annotated (e.g. “p9 start”).
- Summarize in your notebook any instances where modification of one gene affects the sequence of another, or instances where the natural sequence is hard to understand or where a sequence feature makes some human-manipulation undo-able or particularly complex to perform.
- Add your names, your team color, your lab section and today’s date to the top of the document.
- Print out three copies of your document, one to hand in and one for your notebooks.
- Email the document to yourself since you will need it for later assignments.
Part 3: Digest M13KO7
Restriction endonucleases, also called restriction enzymes, cut (“digest”) DNA at specific sequences of bases. The restriction enzymes are named for the prokaryotic organism from which they were isolated. For example, the restriction endonuclease EcoRI (pronounced “echo-are-one”) was originally isolated from E. coli giving it the “Eco” part of the name. “RI” indicates the particular version on the E. coli strain (RY13) and the fact that it was the first restriction enzyme isolated from this strain.
The sequence of DNA that is bound and cleaved by an endonuclease is called the recognition sequence or restriction site. These sequences are usually four or six base pairs long and palindromic, that is, they read the same 5’ to 3’ on the top and bottom strand of DNA. For example the recognition sequence for EcoRI is shown in the figure. Other restriction enzymes, for example HaeIII, cut in the middle of the palindrome leaving no DNA overhang, called a “blunt end.”
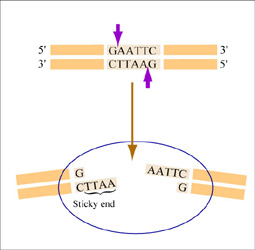
EcoRI cuts between the G and the A on each strand of DNA, leaving a single stranded DNA overhang (also called a “sticky end”) when the strands separate. (Figure by MIT OpenCourseWare.)
One of the most useful resources for restriction enzyme information is the website from New England Biolabs. Use their search engine to retrieve information about the recognition enzymes SmaI and XmaI. Be sure you are clear on how they differ before you move on to the experiment. For example, do the enzymes have the same recognition sites? do they leave the same overhang? will they work in the same buffer? at the same temperature? These are some of the preliminary questions you’ll have to ask yourself whenever you set up a restriction digest.
Next, use the NEB Web site or the paper copy of their catalog to look up the recognition sites for the enzyme BamHI. What overhang does it leave? what buffer is recommended? what temperature does it work best at? You will perform a restriction digest with BamHI which cuts the gene for p3. Label two tubes with your team color, the name of the DNA you’ll digest, and the name of the enzyme (if used).
| TO MODIFY g3 | UNCUT CONTROL | DIGEST |
|---|---|---|
| DNA | 20 µl M13KO7 | 20 µl M13KO7 |
| H2O | To a final volume of 25 µl | To a final volume of 25 µl |
| Buffer (as directed by NEB) | 2.5 µl 10X NEB buffer | 2.5 µl 10X NEB buffer |
| Enzyme | None | 0.5 µl BamHI |
Note 1: For traditional reasons, the volume of enzyme is not included in the final volume of the reaction
Note 2: Assemble your reactions in the following order: water, buffer, DNA and finally enzyme.
Note 3: The restriction enzyme, BamHI, is a protein and so is subject to heat denaturation. Enzymes should be kept on ice and not placed in your room temperature eppendorf rack while you are using them…this will be true all term!
Note 4: You should always be careful about using clean pipet tips but it is especially important to be 100% certain your pipet tip is clean when you are using common stock reagents, like enzymes and buffers. Contamination of a lab’s common stock is incredibly hard to trace and results in lost time and aggravation for everyone.
You can flick the tube to mix the contents and give it a quick spin in the microfuge to bring any droplets down to the bottom of the eppendorf tube (be sure to balance your tube against another in the microfuge). Place both tubes in the 37° incubator while you design the oligonucleotides that you will clone into this digested plasmid. To anticipate a little bit of the nomenclature that will used: this digested plasmid is refered to as the “backbone” of your clone since most of the basic plasmid functions will be provided by this piece of DNA
Part 4: M13KO7 Tag
In the genome engineering module, you will be adding a short sequence of DNA into an existing restriction site in the M13KO7 genome. This modification will simultaneously destroy the natural restriction site and add two new unique ones. Recall, though, that any manipulation to the DNA can affect phage function since nearly every base of the phage genome encodes a gene (at least one!) and there are complex regulatory elements that are known to exist…plus ones we don’t know about yet. Despite the uncertainty, there are three important reasons to undertake the experiments you’re starting today. First, if you’re successful, then the modified phage genome will be a better substrate for later building projects. Second, this project will give us important new information about the phage’s tolerance for manipulation, since these changes have not been applied to the phage genome before. Third, you may discover new things about how that M13KO7 phage genome is organized and operates.
As you design your DNA insert, remember that there is no single “right” design. You will have a framework to operate in. This framework is occasionally constrained by practical considerations, for example we don’t have every known restriction enzyme in the teaching lab and we don’t have limitless time to work on this project. More often, though, the solution to your design task is constrained by nature, who requires triplet codons and palindromic enzyme recognition sites. So be prepared to sketch, refine, redesign and then choose your favorite experimental plan. We expect six groups will find six different solutions
Igonucleotide Design
Begin by opening and printing the translated M13KO7 g3p (PDF)
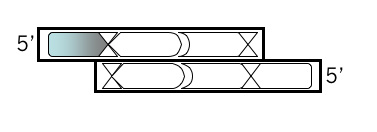
Find the BamHI site on this sequence. It should fall across an E D P sequence about halfway through the protein translation. At the bottom of the printout, write the double stranded sequence for this region, grouping the E D P sequence into the correct codon triplets and indicating the overhanging single stranded sequences you will have once the DNA is digested. Write each strand with the overhangs in lowercase letters and the other (“annealed”) bases in the traditional uppercase throughout. Now you’re ready to plan your insert. Plan the top strand of the insert first
Top Strand, Step 1
Open a new Microsoft® Word file to document your design. For each step, note the step number, the purpose, and then the sequence, including an indication of the 5’ end. Begin your top strand oligonucleotide with the 4 base overhang (in lowercase) that could anneal to the M13KO7 backbone you’ve digested with BamHI. Put a comma, slash or space between codons.

Top Strand, Step 2
If the next base in your oligonucleotide was “C” then it would regenerate the BamHI site when added back to the M13KO7 plasmid backbone. This is not desirable, for reasons that will be clear later. So pick some other base for the next base of your oligonucleotide.

Top Strand, Step 3
Add the first of two new restriction sites that will be unique to M13KO7. Review the list of zero cutter enzymes <**link to mod1.1_zerocutters.txt> that don’t cut M13KO7 can be found here. Using the base from step 2 as the first base of the new site, fill in the rest of the sequence for a new restriction site, including commas, slashes or spaces between codons. Underline the new site and then, just below the sequence, write the name of the enzyme that recognizes it.

Top Strand, Step 4
Use the 3’ base from the site designed in step 3 to add another unique site downstream. Consult the list of zero cutters **link to mod1.1_zerocutters.txt again. If the site you added in step 3 was a blunt cutter, then add a sequence with an overhang. If you’ve already added a restriction site that leaves an overhang when cut, then add a blunt cutter site with this step. Once you’ve chosen a site and added the recognition sequence to the 3’ end of your growing oligo then put commas, slashes or spaces between codons. Box the new site in your MSword document and then, below the sequence, write the name of the enzyme that recognizes it.
Top Strand, Step 5
- Now for some important checks and documentation:
- Confirm that the most 3’ base is not a “G” or the oligonucleotide will regenerate the BamHI site when ligated into the M13KO7 backbone. If it is a “G” then choose a different restriction site for your design.
- Translate the codons that you’ll be adding to the protein. You use the genetic code listed at NEB. If there is a stop codon in your oligonucleotide, then you must reconsider the choices you’ve made. If there are “difficult” amino acids that you’ll be including, for example a string of prolines, then you might reconsider your design. If there are no more changes to be made to the top strand of your oligonucleotide, then write the amino acids that will be encoded above the codons that encode them on your Microsoft® Word document.
Now you’re ready to design the bottom strand. This will be a breeze, with the only really tricky part coming at the end when you turn the sequence you’ve designed around, to list it in the 5’ to 3’ direction as convention dictates.

Bottom Strand, Step 1
You’ll be designing this oligo from the 3’ end so be sure to write that on your Microsoft® Word document before listing any bases that you’ll want to include. Then write the complementary sequence to all but the first 4 bases of your top oligo. By leaving off the first 4 bases, they will remain unpaired when the top and bottom strand anneal. Though it’s not needed for translation (you’ve done that already!), it’s helpful to put a comma, space or slash between the codons just to keep yourself in register.

Bottom Strand, Step 2
Add the 4 base overhang that could anneal to the M13KO7 backbone you’ve digested with BamHI. Be sure you’re clear which end of the oligonucleotide this should be tacked onto. Also be sure you have the correct strand of the recognition site. You might want to draw a picture if you’re puzzled. Put a comma, slash or space between codons if you find that helpful.
Bottom strand, step 3: Document the oligonucleotide pair you’ve designed by “annealing” them at the bottom of your Microsoft® Word document. This will allow you to confirm the base pairing and the single stranded overhangs. You should also indicate above the pair what amino acids you’ll expect each codon to produce and indicate below the pair which restriction enzymes you expect to cut this DNA. Print out 3 copies of your Microsoft® Word document: one for you, one for your lab partner, and one for the teaching faculty.
All that’s left now is to place the order. To do this you must:
- Reverse the bottom strand’s sequence so it’s written in the 5’ to 3’ direction.
- Add the sequences to the table on the “talk” page associated with today’s lab. Note the restriction enzymes you’ll need there as well, and upload the Microsoft® Word document to keep a record of your work.
Before you leave, give your digested DNA samples to the teaching faculty, who will freeze them away for next time.
DONE!
For Next Time
All “for next time” assignments should be printed out and handed in at the beginning of the next lab period, unless otherwise indicated.
- The major writing assignment for this module will be a description of your M13 renovation work. Use the summary in your lab notebook to start a table on your wiki user page to organize your thoughts about the existing genome. Generate a table that lists each gene and any re-engineering ideas you have for it. Print out this table to hand in next time. If you want to start a new wiki page for this part of the assignment, go for it but be sure to follow OWW page naming guidelines and choose something like “username:superM13” as the title for your page not just “myM13” since there will soon be several people trying to name their page exactly that.
- Nature often preserves functionally critical genomic elements, and evolutionary cousins can help us identify which genetic elements are disposable, which are interchangeable, and which are essential. Who are M13’s closest evolutionary relatives and how do they differ from the phage you’re working with?
- Register for an account at the Registry for Standard Biological Parts. This site is a clearing house for engineered biological parts that can be used as substrates for building. Look up part BBa_M1307 and write a response to the following criticism: “BBa_M1307 is not a standard biological part and does not belong in the registry.”
Reagents List
1. “10X NEBuffer 1:
- 100 mM Bis Tris Propane-HCl
- 100 mM MgCl2
- 10 mM DTT
2. “10X NEBuffer 2:
- 500 mM NaCl
- 100 mM Tris-HCl
- 100 mM MgCl2
- 10 mM DTT
3. “10X NEBuffer 3:
- 1 M NaCl
- 500 mM Tris-HCl
- 100 mM MgCl2
- 10 mM DTT
4. “10X NEBuffer 4:
- 200 mM Tris-acetate
- 100 mM MgAc
- 500 mM KAc
- 10 mM DTT


