Modules: 2.1 | 2.2 | 2.3 | 2.4 | 2.5 | 2.6
Introduction
Luciferase is an enzyme that oxidizes its substrate, luciferin. The product, oxyluciferin, emits light in the blue range of the visible spectrum, 440-479 nm. The oxidation reaction is fundamentally different from another light emitting reaction you may be familiar with, fluorescence, as seen with GFP. During fluorescence absorbed light is re-emitted by the excited fluor, as light of a longer wavelength (this is called a Stokes shift); in the case of GFP, absorbed blue light is emitted as green light, ~ 505 nm. Interestingly our luciferase source, Renilla reformis, has both a luciferase-luciferin pair as well as GFP. Consequently the oxidation reaction can lead to oxyluciferin luminescence and then to fluorescence, through energy transfer to GFP, giving the soft corals a blue-green glow.
Luciferin-luciferase pairs are widely used in nature for courtship, camouflage or baiting. Fireflies (also known as lightning bugs or more technically Photinus pyralis) use an ATP-requiring luciferin-luciferase pair and emit species-specific patterns of light as part of their mating ritual. Bioluminescent bacteria (such as Vibrio harveyi) can be found in symbiotic relationships with marine organisms. The fish give such bacteria a suitable home and in return the bacteria emit light to give the fish “night vision,” or to mask the fish’s shadow, effectively cloaking them from their prey. The usefulness of such luciferin/luciferase pairs was not lost to researchers who began isolating and sequencing luciferase genes from different organisms in order to clone them into useful vectors, such as the one we’ll use today.
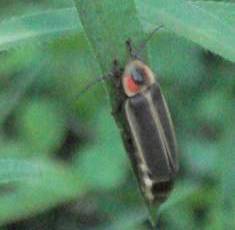
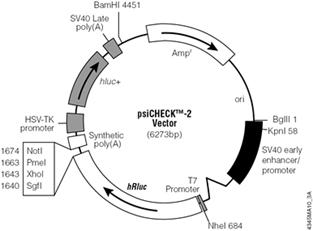
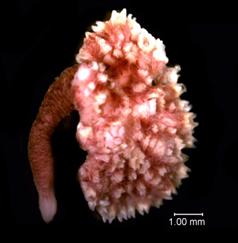
Left to right: Firefly photo courtesy of Eloise Mason (Flickr). Plasmid map. (Courtesy of Promega Corporation. Used with permission.) “Sea pansy” (Renilla reniformis) courtesy of NOAA.
Unexpectedly, there is little primary sequence similarity for luciferases from different organisms. This finding will be used to our advantage as we target mRNA from the Renilla luciferase gene for destruction while using the product of the firefly luciferase gene as an unaffected control. On the plasmid we will use, each gene is controlled by a strong constitutive promoter, leading to high expression levels of both luciferases when the plasmid enters a mammalian cell. Other plasmid features that you will be familiar with from experimental module 1 include an antibiotic resistance gene, in this case against the antibiotic ampicillin, that serves as a selectable marker in bacterial cells, a bacterial origin of replication, and multiple restriction sites that can be used for cloning.
In many ways, the assay for luciferase activity is a “standard” assay. The enzyme and substrate must react for a defined time and the amount of product gets recorded. What’s a little unusual is that in this case the measured product is light and the light can be quantified using a luminometer. Today’s reactions are slightly more advanced than standard ones in that you’ll perform two sequential measurements. The first reaction is initiated with Beetle luciferin, a substrate for firefly luciferase. The light produced, called a “flash reaction” because it does not persist, will be measured for 10 seconds and then a reagent to stop the reaction will be added. The stop reagent also contains the substrate to initiate the second reaction. Coelenterazine reacts with Renilla luciferase in a “glow reaction” which decays more slowly but you will measure it for precisely 10 seconds so the lumens emitted can be compared to those from the firefly luciferase. There are several attractive aspects to these reactions including the assay’s low cost, high speed, great sensitivity (to attomolar amounts of luciferase, that’s 10-18th!) and wide dynamic range, linear through 7 orders of magnitude. It is also beneficial that there is no endogenous luciferase-luciferin pair in most experimental organisms.
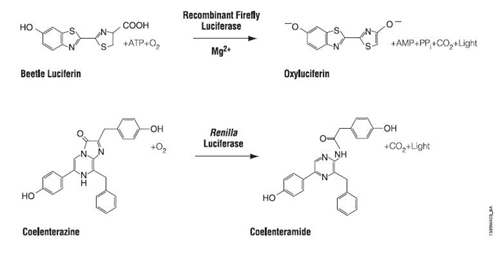
Plasmid reaction. (Courtesy of Promega Corporation. Used with permission.)
There are two parts to today’s lab. Half the class will begin in the TC facility transfecting MES cells with the luciferase reporter plasmid and siRNAs. The other half of the class will begin by testing some control extracts from transfected cells to become familiar with the luciferase assay and analysis of the data that is generated. Midway through the lab period, the groups will switch places so everyone will have an opportunity to perform both protocols.
Protocols
Part 1: Transfection
DNA can be put into mammalian cells in a process called transfection. Mammalian cells can be transiently or stably transfected. For transient transfection, DNA is put into a cell and the transgene is expressed, but eventually the DNA is degraded and transgene expression is lost (“transgene” is used to describe any gene that is introduced into a cell). For stable transfection, the DNA is introduced in such a way that it is maintained indefinitely. Today you will be transiently transfecting your cultures of mouse embryonic stem cells.
There are several approaches that researchers have used to introduce DNA into a cell’s nucleus. At one extreme there is ballistics. In essence, a small gun is used to shoot the DNA into the cell. This is both technically difficult and inefficient, and so we won’t be using this approach! More common approaches are electroporation and lipofection. During electroporation, mammalian cells are mixed with DNA and subjected to a brief pulse of electrical current within a capacitor. The current causes the membranes (which are charged in a polar fashion) to momentarily flip around, making small holes in the cell membrane that the DNA can pass through.
The most popular chemical approach for getting DNA into cells is “lipofection.” With this technique, a DNA sample is coated with a special kind of lipid that is able to fuse with mammalian cell membranes. When the coated DNA is mixed with the cells, they engulf it through endocytosis. The DNA stays in the cytoplasm of the cell until the next cell division at which time the cell’s nuclear membrane dissolves and the DNA has a chance to enter the nucleus.
Two days ago, cells were prepared for you at a density of 1 X 10^5 cells/well in all six wells of two six-well plates.
A schematic of your experiment is shown below.
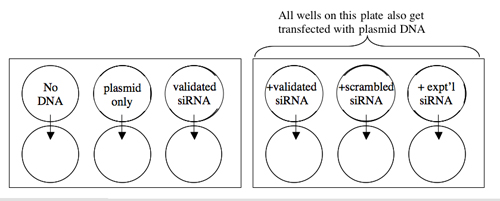
Transfection Scheme.
All manipulations are to be done with sterile technique in the TC facility. In addition, since you will be working with RNA, it is important to wear gloves whenever you are handling the transfection reagents. This will protect them from degradative enzymes on your fingers.
Timing is important for this experiment, so calculate all dilutions and be sure of all manipulations before you begin.
For each lipofection you will need:
- Carrier: 3 µl Lipofectamine 2000 in 50 µl OptiMEM (50 µl is the final volume, so don’t forget to subtract the volume of Lipofectamine)
- DNA: 20 ng of psiCHECK2 in 50 µl OptiMEM (final volume) and/or
- siRNA: 10 pmoles in 50 µl OptiMEM (final volume is 50 µl and final tx’n concentration of 10 nM)
-
Dilute enough carrier for 12.5 lipofections. Let the dilution sit in the hood undisturbed for at least 5 minutes but not more than 30.
-
All the lipofections will be done in duplicate with 20 ng of DNA/well and/or 10 pmoles of siRNA/well. Prepare a cocktail with enough material to perform both replicates. The following table may be helpful for your calculations.
Lab notes.
TUBES [DNA] STOCKS VOLUMES DNA NEEDED [siRNA] STOCKS VOLUMES siRNA NEEDED OPTIMEM No DNA -– -– -– -– 100 µl Plasmid Only 20 ng/µl -– -– siRNA Only -– -– 10 pmol/µl Plasmid+siRNA (validated) 20 ng/µl 10 pmol/µl Plasmid+siRNA (scrambled) 20 ng/µl 10 pmol/µl Plasmid+siRNA (experimental) 20 ng/µl 10 pmol/µl -
To the six eppendorf tubes you prepared above, add an equal volume of diluted carrier and pipet up and down to mix.
-
Incubate the DNA/RNA/lipofectamine cocktails undisturbed at room temperature for 20 minutes. During this time, aspirate the media from the cells in your 6-well dishes, wash the wells with 2 ml PBS from a 10 ml pipet, then put 1 ml of fresh Pre-transformation Media on the cells, dispensed from a 5 ml pipet.
-
After the 20 minute incubation is over, use your P200 to add 95 µl of the appropriate DNA/RNA/lipofectamine complexes to each well. Since the carrier is quite toxic to the cells it’s a good idea to gently rock the plate back and forth after each addition.
-
Return the plate to the 37° incubator.
-
One of the teaching faculty will complete the transfection protocols by performing the following steps:
- Plates will be incubated overnight @ 37°C, 5% CO2.
- Tomorrow, the media and transfection reagents will be aspirated and replaced with 3ml fresh JI growth media with serum and antibiotics.
- Plates will be incubated overnight @ 37°C, 5% CO2.
Next time you and your partner will collect cells from today’s transfections to analyze their luciferase activity and isolate total RNA for microarray analysis.
Part 2: Practice Luciferase Reactions
In the main teaching lab you will have some cell lysates to study. The precise identity of these samples is not important. Rather, you should use them to familiarize yourself with the mechanics of the dual-luciferase assay as well as the particulars of data analysis.
General considerations:
- Assays should be performed without gloves since these may generate static electricity that will be detected by the luminometer.
- All reagents must be at room temperature.
- PBS can be used to dilute lysates that give readings beyond the upper range of the luminometer (">9999”). Needless to say the dilution factor must be taken into account when analyzing your data so keep track.
- Do not pipet less than 10 µl of lysate to each reaction or for each dilution since the error in pipeting smaller volumes may confound your data analysis.
- Do not make any additions to the eppendorf while holding it directly above the luminometer. Airborn droplets may fall into the machine.
- Keep the luminometer’s sample lid closed as much as possible. The clicking noise you hear when it’s open should remind you to do this.
- Add 50 µl of LARII to a series of eppendorf tubes. LARII has Beetle luciferin, the substrate for firefly lucferase.
- Add 10 µl of cell lysate. Pipet up and down several times to mix then close the cap. The reaction between any firefly luciferase and LARII will measurably decay after only 2 minutes so it is important to collect your data relatively quickly.
- Place the eppendorf into the Turner Luminometer 20/20 and press the green “GO” button. One of two things will happen. Either the machine collect a 10 second record of the light from your sample (in which case you should write down the number then proceed to step 4), or it will inform you that the sample is out of range (>9999) in which case you should return to step 2, trying a 1:10 dilution of your lysate.
- Once the first measurement has been made, add 50 µl of the “Stop and Glo” reagent, which will both quench the first reaction and also initiate the second. You should do this before starting any other LARII reactions with other lysates.
- Measure the light produced from the reaction of the Renilla luciferase just as you did the first.
DONE!
For Next Time
- Convert any luminescence data you collected into ALU/µl of lysate where ALU is an abbreviation for “artificial light units.” Present your data as a well-labeled bar graph. Include a title and legend as if the data were a figure in a scientific paper.
- Anticipate the following manipulations of your data:
- Background subtraction: Background may come from light leaks into the luminometer, from autoluminescence of the reagents you used, or from other proteins in the cell lysates that might produce some light. Which sample you transfected today could be used to take these considerations into account?
- Normalization: In the RNAi experiment you have performed, the firefly luciferase should be unaffected by any of the siRNAs and thus can be used to normalize for transfection efficiency in each well. With the data you collected today, express each Renilla luciferase measurement as a fraction of the firefly luciferase value. What does a value less than one tell you? If you were to plot the ratios on an X-Y axis, would a four-fold increase and a four-fold decrease be visually equal?
Write the Materials and Methods section for your lab report based on the material we’ve done so far, namely siRNA design, transfection, and luciferase assays (you’ll have to read ahead to the next lab for the details of the samples you’ll be really testing). You do not have to include M&M for the “practice luciferase reactions” you performed today as they are not fundamental to the experiment itself. Again consult the Guidelines for writing a lab report. Again, you and your lab partner can and should help each other. When it comes time to write, you must do so on your own. You and your lab partner will hand in individual assignments.
Reagents List
- JI Media (complete)
- DMEM (high glucose), 10% Fetal Bovine Serum, 100U/ml Pen/Strep, 0.3 mg/ml glutamine, 50 µl/L LIF
- Pre-transfection Media
- DMEM (high glucose), 10% Fetal Bovine Serum, 0.3 mg/ml glutamine, 50 µl/L LIF
- Validated Renilla luciferase siRNA (all siRNA stocks are 10 pmoles/µl)
- GGC.CUU.UCA.CUA.CUC.CUA.C dT.dT
- dTdT CCG.GAA.AGU.GAU.GAG.GAU.GA
- Scrambled siRNA, also called non-targeting siRNA#2 from Dharmacon
- UAA.GGC.UAU.GAA.GAG.AUA.C dT.dT
- dTdT AUU.CCG.AUA.CUU.CUC.UAU.GA
- LARII and Stop&Glo
- Promega dual-luciferase assay reagents


