
Now let’s shift our focus to the Build phase. Going forward, we assume that you have the kit and are ready to continue.
Setting Up Your Software
The first step of recreating the Adafruit experiment is to set up the development environment. A development environment usually includes a text editor to program in, such as an Integrated Development Environment or IDE for short, a required set of dependencies like libraries (bundled code for reuse), and a way of building and then imaging your code onto the final device (if there is hardware involved). Here, we will be using CircuitPython to help with these tasks.
This lab is pulled from Adafruit’s Hide and Seek Bluefruit Ornament experiment. The incorporated tutorial that follows will take you through downloading the Python environment/app to program your new board.
Through this experiment, we will give you an initial look into programming as well as working with development boards. The code is provided for you for ease of use. This way, you can focus on the process of setting up a development environment and imaging code to run on your circuit board, not on the program language syntax. We also break down the code to describe how it works.
Install Circuit Python
Download the latest version of Circuit Python from circuitpython.org (Click on Download .UF2) and save it to your Desktop (or wherever is handy).
Plug your Circuit Playground Bluefruit into your computer using a known-good data-capable USB cable.
NOTE: A lot of people end up using charge-only USB cables and it is very frustrating! Make sure you have a USB cable you know is good for data sync.
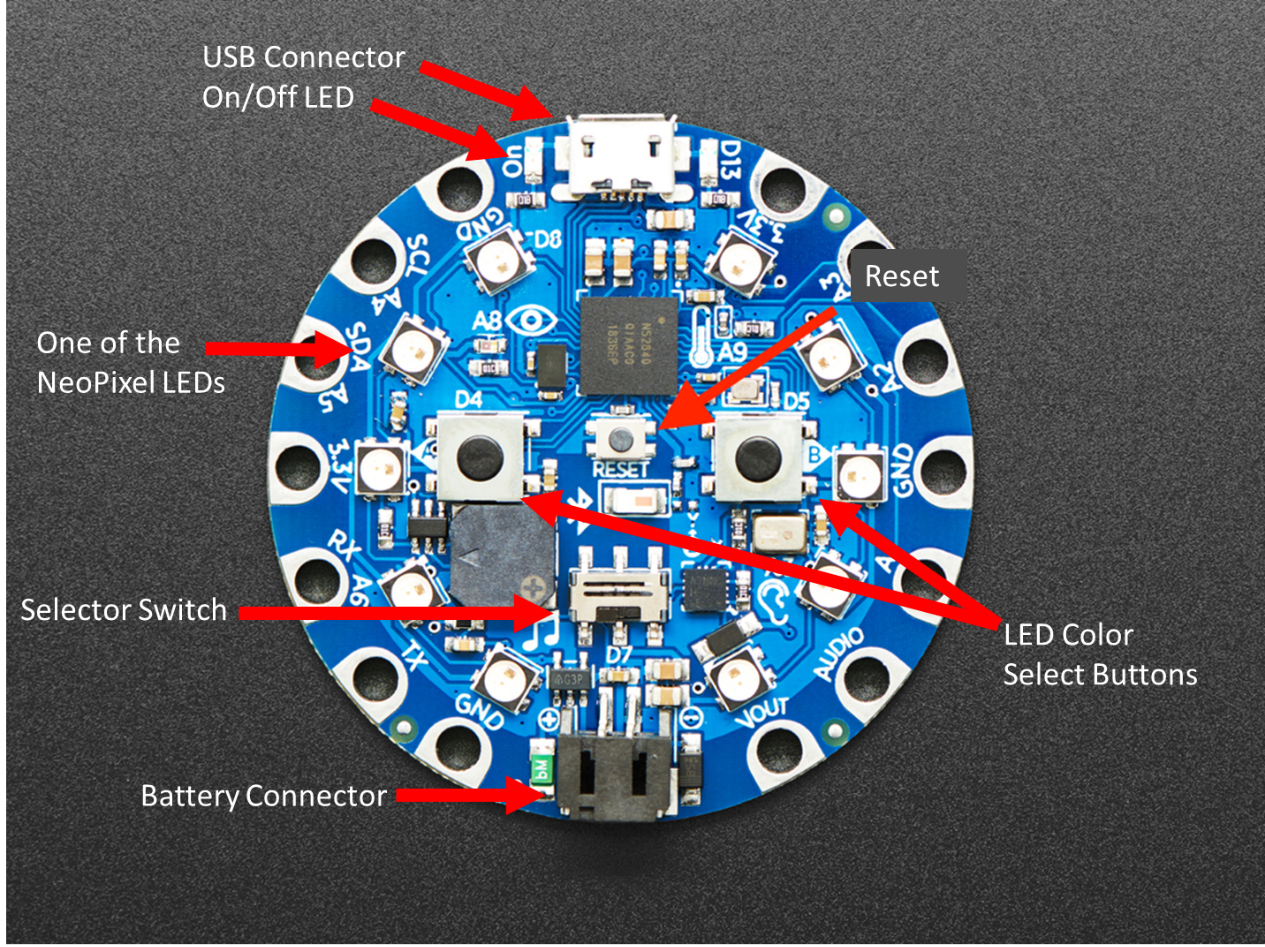
Double-click the small Reset button in the middle of the CPB (indicated by the red arrow in the image). The ten NeoPixel LEDs (pixels) will all turn red, and then will all turn green. If they turn all red and stay red, check the USB cable, try another USB port, etc. The little red LED next to the USB connector will pulse red - this is ok!
Go to Control Panel and select Devices and Printers. You will see a new disk drive appear called CPLAYBTBOOT.
Go to File Manager. Drag the adafruit_circuitpython_etc.uf2 file to CPLAYBTBOOT.
The LEDs will turn red. Then, the CPLAYBTBOOT drive will disappear and a new disk drive called CIRCUITPY will appear. That’s it, you’re done! :)
Set Up Circuit Python Libraries and Circuit Playground Bluefruit
If you do not already have an empty lib folder on your CIRCUITPY drive, create one now.
Go to https://circuitpython.org/libraries and download the latest version of the adafruit-circuitpython-bundle. The bundle will download as a .zip file. Extract the file and open the resulting folder. Open the lib folder found within.
Once inside, you’ll find a lengthy list of folders and .mpy files, but we only need some of them. To install a CircuitPython library, you drag the file or folder from the bundle lib folder to the lib folder on your CIRCUITPY drive.
Copy the following folders and files from the bundle lib folder to the lib folder on your CIRCUITPY drive:
Folders
- adafruit_ble
- adafruit_bluefruit_connect
- adafruit_bus_device
- adafruit_circuitplayground
- adafruit_gizmo
- adafruit_hid
Files
- adafruit_lis3dh.mpy
- adafruit_thermistor.mpy
- neopixel.mpy
Now you’re all set to use CircuitPython with the features of the Circuit Playground Bluefruit!
Code with Circuit Python
The adafruit_circuitplayground library allows us to use essential commands and features of the board without a lot of setup in our code! Since we’re using the adafruit_circuitplayground library in this project, be sure you have all of the libraries installed as specified in the section above.
Let’s talk about what the code does and how it works! The code is written out below but is available for easy download: Python Code (PY). Once downloaded, copy the file into the CIRCUITPY drive and overwrite the default “code.py” file that is there. Before you run it though, let’s look at what it does.
Code.py Code Load:
# Start copying here
# This section is comments! Comments are needed so the engineer can remember why they
# did what they did as well as let others who use the code to quickly understand.

"""
Circuit Playground Bluefruit Ornament Proximity
This demo uses advertising to set the color of scanning devices depending on the strongest broadcast signal received. Circuit Playgrounds can be switched between advertising and scanning using the slide switch. The buttons change the color when advertising.
"""

# Import the libraries. Libraries hold complicated functions that are abstracted to make
# writing code easier.

import time
from adafruit_circuitplayground.bluefruit import cpb
from adafruit_ble import BLERadio
from adafruit_ble.advertising.adafruit import AdafruitColor

# This section selects the colors that will be displayed by the LED.
# The color pickers will cycle through this list with buttons A and B.

color_options = [0x110000,
                 0x111100,
                 0x001100,
                 0x001111,
                 0x000011,
                 0x110011,
                 0x111111,
                 0x221111,
                 0x112211,
                 0x111122]

# Here, the Blue Tooth Low Energy (BLE) Radio is set up.

ble = BLERadio()

# This section is a patch to keep the pixels from flickering.

i = 0
advertisement = AdafruitColor()
advertisement.color = color_options[i]
cpb.pixels.auto_write = False
cpb.pixels.fill(color_options[i])

# Below is the main loop of code.
# This first mode broadcasts signals from the BLE radio.

while True:
    # The first mode is the color selector which broadcasts its current color to other devices.
    if cpb.switch:
        print("Broadcasting color")
        ble.start_advertising(advertisement)
        while cpb.switch:
            last_i = i
            if cpb.button_a:
                i += 1
            if cpb.button_b:
                i -= 1
            i %= len(color_options)
            if last_i != i:
                color = color_options[i]
                cpb.pixels.fill(color)
                cpb.pixels.show()
                print("New color {:06x}".format(color))
                advertisement.color = color
                ble.stop_advertising()
                ble.start_advertising(advertisement)
                time.sleep(0.5)
        ble.stop_advertising()

# This second mode listens for broadcasts from other Adafruit BLE radios that are seeking. # The LEDs will light up if your detector hears from another unit.
# The second mode listens for color broadcasts and shows the color of the strongest signal.

    else:
        closest = None
        closest_rssi = -80
        closest_last_time = 0
        print("Scanning for colors")
        while not cpb.switch:
            for entry in ble.start_scan(AdafruitColor, minimum_rssi=-100, timeout=1):
                if cpb.switch:
                    break
                now = time.monotonic()
                new = False
                if entry.address == closest:
                    pass
                elif entry.rssi > closest_rssi or now - closest_last_time > 0.4:
                    closest = entry.address
                else:
                    continue
                closest_rssi = entry.rssi
                closest_last_time = now
                discrete_strength = min((100 + entry.rssi) // 5, 10)
                cpb.pixels.fill(0x000000)
                for i in range(0, discrete_strength):
                    cpb.pixels[i] = entry.color
                cpb.pixels.show()

            # Clear the pixels if we haven't heard from anything recently.

            now = time.monotonic()
            if now - closest_last_time > 1:
                cpb.pixels.fill(0x000000)
                cpb.pixels.show()
        ble.stop_scan()

# Stop copying here
*And that’s the end of the code needed to run the device. *
Now, let’s see how this newly programmed device works!
Assembling Your Hardware
This is a simple and portable build for your hide and seek adventures.
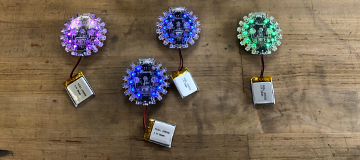
Plug in the batteries into the battery ports.
Once the boards turn on, move the selector switch to the left on the boards you will be seeking and to the right on the one you will be using as a detector.
If at any point your board stops functioning, make sure the battery is fully plugged in.


