MAS.962 | Spring 2010 | Graduate

Special Topics: New Textiles

Assignments and Final Project

Assignment 6: Networked Wearable

« Previous: Assignment 5: Nonwoven Next: Assignment 7: Final Project Proposal »

For this assignment you will work in teams, in collaboration with the 21W.789 Communicating with Mobile Technology class, to build a textile that talks to a mobile phone. With your team you should create a webpage that documents your project. Your page should include pictures and a discussion of your experience. Also create a short video of your project in action; post the video online (Vimeo, YouTube, or your own site) and include a link to your video in your documentation page.

Assignment Resources

Arduino

Arduino Web site

LilyPad Arduino Web site

Limor Fried’s excellent Arduino tutorial

Buy a LilyPad Arduino

Buy an Arduino mini

Buy a Bluetooth module

Arduino pin mapping

Amarino: A Tool That Connects Arduino and Android

Amarino Web site - you will probably want to begin with the Getting Started page.

Make a Textile Arduino

An example textile Arduino circuit.

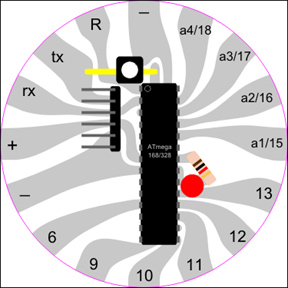
Here’s a diagram that shows how the ATMega168 pins are mapped to Arduino pins:

Mapping ATMega168 pins to Arduino pins. (Courtesy of Arduino.cc. Used with permission.)

Circuit drawing in Adobe Illustrator format (AI)

Code for ATmega168 microcontroller (arduinoBootloader)

Supplies

ATmega168

Switch

Header

0.1uF capacitor

Jumper wire for TX (yellow in the above circuit drawing)

LED

1K ohm resistor

Sample Student Work

Sample work is presented courtesy of the students and used with permission.

Wrist-based Way-Finding

Hello USA Neworked Wearable

« Previous: student work sample Next: Return to Assignment 6 description »

By Yang Yang and three anonymous MIT students

Schematic of United States map with grid of LEDs, controlled by circuits.

Coordinate system that we used to light the LEDs from the LilyPad.

These Vertical pins were set to LOW: 11, 12, 13, a0(14), a1(15), a2(16), a3(17), a4(18), a5(19), 2, 3.   
These Horizontal pins were set to HIGH: 10, 9, 8, 7, 6, 5, 4.

Charlieplex State Drawing Detail

We did not have enough pins on our LilyPad to control each led separately. Using charlieplexing we can have up to n/2*(n/2) leds, where n is the number of pins on our Lilypad.

A grid of conductive fabric was made, positive legs of the LEDs were sewn to horizontal bars, the ground leg was sewn to the vertical strips.

We could then program the power to be sent to each LED, and turn all the others off by making them the opposite charge of the LED we wanted to light up.

The horizontal pins were set to HIGH and the vertical pins set to LOW. Each state had an associated LED, to turn on a particular pin its horizontal bar was called at HIGH and its vertical bar was called at LOW.

Wikipedia has a good reference article on charlieplexing.

Charlieplexing

The back of the map. The LEDs are sewn positive leg to horizontal and ground to vertical. Felt pads are used to keep horizontal and vertical layers apart.

The LilyPad layer set over the charlieplex felt layer. This is the final layer that has the conductive thread connecting from the LilyPad to the charlieplex grid at the edges of the felt.

« Previous: student work sample Next: Return to Assignment 6 description »

« Previous: Return to Assignment 6 description Next: student work sample »

New Textiles students: Dawn Wendell, Rizal Muslimin and anonymous student
Communicating with Mobile Technologies students: Thomas Lipoma and anonymous MIT student

The wristband component of the way-finder.

For our collaboration with the Communicating with Mobile Technologies class, we decided to make a wearable information display with two RGB LEDs. We envisioned these LEDs being used for guidance similar to the kids games of “simon says” or “hot and cold”, with the LEDs changing colors in response to the user’s orientation and distance from a target location. This is a more passive way of giving directions, with the user having to be actively involved in the discovery of the target place.

The Textiles team built a wrist-based device, connected with the LilyPad and two RGB LEDs. We also completed the bluetooth connection from the phone to the device and troubleshot the system using the output from the phone compass.

Design elements of the wrist-based way-finder.

Here is a video of the wristband responding to compass directions from the phone.

One LED changes color in response to the orientation of the phone, and the other LED changes from red to green when the phone has been held in the green (“correct”) position for longer than 3 seconds. This pause / response is intended to signify that you have traveled in the correct direction and have now arrived at the destination.

Potential applications include mobile navigation support and physiological monitoring. (Map image source © Google. All rights reserved. This content is excluded from our CreativeCommons license. For more information, see http://ocw.mit.edu/fairuse)

Lessons Learned

  • We tried to make our own circuit, but were not able to get it working. Should have tested the circuit before sewing it to the wristband.
  • The battery holder we were given gave us lots of trouble - the leads kept falling off so we spent a lot of time ripping them off the wristband and resoldering them, even though we tried to sew the leads in place for strain-relief.
  • It was very hard to do anything in parallel because we had one device, one LilyPad, one phone, and two groups from the Mobile Technologies class who both needed to use the textile device.
  • Scheduling undergrads and grads together is HARD. We were never able to actually meet up with our Mobile Technologies teammates.

Testing the system.

Contributions

Anonymous student: software, phone connection
Dawn: wristband, documentation
Rizal: circuit, soldering, documentation

Code

BDR Standalone (TXT)
BDR Integrated (TXT)

« Previous: Return to Assignment 6 description Next: student work sample »

Course Info

Instructor
As Taught In
Spring 2010
Level
Learning Resource Types
Other Video
Image Gallery
Projects with Examples
Design Assignments with Examples