MAS.962 | Spring 2010 | Graduate

Special Topics: New Textiles

Readings, Lectures & Tutorials

Lectures and Readings

[Kadolph and Langford] = Kadolph, S. J., and A. L. Langford. Textiles. 10th ed. Upper Saddle River, NJ: Prentice Hall, 2007. ISBN: 9780131187696.

SES # TOPICS LECTURES & TUTORIALS READINGS & REFERENCES
1

Introduction

- Materials: conductive fabrics, conductive threads and yarns

- Techniques: hand sewing, switch design

Slides (PDF - 1.7MB)  
2

Conductive textiles

- Materials: conductive fabrics, conductive threads and yarns, LEDs

- Techniques: simple circuit design

Slides (PDF)  
3

Textile sensors

- Materials: resistive yarns, piezo resistive (pressure sensitive) materials

Techniques: sensor design

Slides (PDF - 10.3MB)(Courtesy of Hannah Perner-Wilson. Used with permission.

Plusea. “Fabric Poteniometer (update).” March 27, 2009. YouTube. Access October 6, 2010. www.youtube.com/watch?v=G7z7AMOds-w

4

Fabric PCBs, part 1

- Materials: conductive fabrics, fabric adhesives

- Techniques: soldering, circuit design

Fabric PCB tutorial (PDF) Buechley, L., and Eisenberg, M. “Fabric PCBs, Electronic Sequins, and Socket Buttons: Techniques for E-textile Craft.” Journal of Personal and Ubiquitous Computing, 13, no. 2 (2009): 133-150. (PDF)
5 Guest lecture by Marcelo Coelho, MIT Media Lab    
6

Fabric PCBs, part 2

- Materials: microcontrollers

- Techniques: laser cutting, microcontroller programming

- Machines: laser cutter

Laser cutter tutorial

AVR programming 1

AVR programming 2

 
7 Guest lecture by Prof. Yoel Fink, MIT Materials Science and Engineering    
8

Fibers and yarns

- Materials: fibers and yarns

- Techniques: spinning, metal wrapping, wire extrusion, etc.

- Fiber & yarn terminology, measurement units and methods

Fiber slides (PDF)

Yarn slides (PDF)

[Kadolph and Langford], chapters 3-11

Wikipedia: Units of textile measurements

Yarn calculator

9 Guest lecture by Greg Rutledge, MIT Chemical Engineering    
10 Spinning workshop    
11

Nonwovens

- Materials: fibers (including natural, metal, fusible plastics, paper, etc.)

- Techniques: felting, fusing, sewing


[Kadolph and Langford], chapter 15.

gawara. “Mongolian Felt Making.” May 27, 2006. YouTube. Access October 6, 2010. www.youtube.com/watch?v=gJ0uojUHYdA

12

Wearable computing, part 1 (joint class with 21W.789 Communicating with Mobile Technology)

- Materials: Arduino, AndroidTM

- Techniques: networking

   
13 Guest lecture by Tricia Wilson Nguyen, Thistle Threads    
14

Wearable computing, part 2 (joint class with 21W.789 Communicating with Mobile Technology)

- Materials: Arduino, Android

- Techniques: networking

   
15 Guest lecture by Despina Papadopoulos, Studio 5050, NYU    
16 Wearable computing assignment presentations, with 21W.789 Communicating with Mobile Technology    
17

Embroidery and printing

- Materials: threads, stabilizers, inks and paints

- Techniques: embroidery design, embroidering circuitry, algorithmic design, digital printing

- Machines: embroidery machine, printers

Embroidery design software

Embroidery machine

[Kadolph and Langford], chapter 19.
18 Guest lecture by Rehmi Post and Kit Waal, MIT    
19 Final project proposal presentations    
20 Guest lecture by Becky Stern, MAKE and CRAFT    
21

Knitting and weaving

- Materials: yarns (cotton, wool, etc., conductive, resistive), knitting software

- Techniques: algorithmic knit and weave design, knitting and weaving software, knitting sensors

- Machines: knitting machines (circular and flat), jacquard looms, hand looms


Videos

Knitting machine cast off: dianaknits. “Lesson 9 Latch Tool Bind Off.” July 28, 2009. YouTube. Accessed October 5, 2010. www.youtube.com/watch?v=OsNZIlT7zfw

Maggie Orth’s woven color changing pieces: erikbenson. “Dynamic Double Weave, by Maggie Orth.” June 21, 2007. YouTube. Accessed October 5, 2010.
www.youtube.com/watch?v=No2tNYDzbZY

Industrial circular knitting machine: sandaloom. “Circular Knitting Machine Video Display…” [sic.] May 13, 2009. YouTube. Accessed October 5, 2010.
www.youtube.com/watch?v=wmf6lm5fZz0

Industrial loom: yuwen0122. “High Speed Rapier Loom.” December 1, 2007. YouTube. Accessed October 5, 2010.
www.youtube.com/watch?v=Wq3vxydxMHo

weaverstaceyuk. “Jacquard Loom Walkthrough.” March 3, 2010. YouTube. Accessed October 5, 2010.
www.youtube.com/watch?v=f1Zzj9ZBYmQ

22 Guest lecture by Anne Whiston Spirn, MIT  

Artists and designers discussed in this session:

- NUNO

- Randy Darwall

- Kiss of the Wolf

23 Field trip to the RISD Textile department    
24 Knit, woven, embroidery presentations    
25

Pattern design

- Techniques: pattern design, sewing

Guest lecture by Sheila Kennedy, MIT Architecture and KVA


Armstrong, H. Joseph. Patternmaking for Fashion Design. 5th ed. Upper Saddle River, NJ: Prentice Hall, 2010, chapters 1-3. ISBN: 9780136069348.

princesteve. “Flat pattern to 3D.” October 31, 2006. YouTube. Accessed October 5, 2010. www.youtube.com/watch?v=Eq7O6-g5MKc

safakmakina. “Band knife cutting machine 2.” January 31, 2008. YouTube. Access October 5, 2010.
www.youtube.com/watch?v=OoHwkHWKg5w

Garmento.org. “Origins of the sewing machine - a time line.” (PDF)

Pattern making software

- Lectra

- Gerber

- TUKAtech (renting options)

- Optitex

26 Visit from Kelly Dobson’s “Textile Futures” class @ RISD    
27 Final project presentations    

« Laser Cutter Tutorial | Readings, Lectures & Tutorials Index | AVR Programming, Part 2 »

1. Make sure you’ve installed the necessary software.

Mac: CrossPack

Windows: WinAVR

Important Note for people running Windows: on Windows you will also have to install the driver for the USB programmer. If the driver does not successfully install automatically after you plug in the programmer, try downloading the latest libusb driver from SourceForge.

Unfortunately Windows 7 does not support the USB programmer we will be using, so if you have a machine with Windows 7 you should use the Mac computer in the high-low tech lab to do your programming.

For windows Vista 64, you need to first install AVR Studio 4. then install WinAVR 20100110. Then, download msys-1.0-vista64.zip (ZIP) and put that into your winavr/utils/bin directory. Then things should compile.

2. Get your materials together

ATtiny13 on a fabric PCB

AVRISP programmer with homemade alligator clip attachment

USB cable

3. Download some code

Download and unzip NewTextilesAVR.zip (ZIP) which contains all of the files you’ll need. Put the NewTextilesAVR folder on your desktop.

4. Open up a terminal window, a window that allows you to type out commands to send to your computer

On a Mac, go to the Applications→Utilities folder and open Terminal.app.

On a PC, go the Start menu and select Run. Then type cmd in the text box that pops up.

5. Navigate to the code folder within the NewTextilesAVR folder or “directory”

On a Mac, type the following command: cd Desktop/NewTextilesAVR/code

The cd stands for “change directory”.

6. Plug in your programmer and attach your circuit to your computer

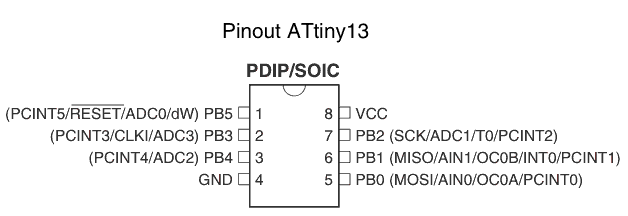
Here is the pin layout diagram for the ATtiny13 chip – the miniature computer that we’ll be using. The diagram is from the ATtiny13 datasheet (PDF - 2.9MB).

ATiny13 pinout diagram. (© Atmel. All rights reserved. This content is excluded from our Creative Commons license. For more information, see http://ocw.mit.edu/fairuse)

The first important thing to know is how to orient the chip to the diagram. We need to know which way is up. If you look closely at the chip you will see a small dot in one corner. This dot indicates the top of the chip. When you match your chip to the diagram, the dot should be in the upper left hand corner of the chip, like so:

Orienting your ATiny13 device.

The diagram also shows the different functions of each leg of the ATtiny13 chip. To program the chip–to tell it what to do–we need to attach certain legs to our programmer.

Clip the programmer to your circuit, attaching the labeled alligator clips to the appropriate legs of the chip. Refer to the diagram above and follow the traces of your circuit. We need to attach + (also called “VCC” or “power” and usually colored red), - (also called “GND” or “ground” and usually colored black), RESET, MOSI, MISO, and SCK. Use the round piece of plexiglass to support your circuit. Here is a photograph that shows what the physical attachment should look like.

Attaching programmer to the ATiny13 using your circuit.

NOTE: IF YOUR CHIP IS GETTING HOT AFTER YOU ATTACH IT, UNPLUG EVERYTHING IMMEDIATELY. THIS MEANS YOU HAVE A SHORT & YOU’RE FRYING YOUR CHIP & MAYBE THE PROGRAMMER TOO.

7. Program your chip.

Type the following command in Terminal: make clean && make && make install

If all goes well, the LED on your fabric circuit should begin to blink.

8. Open the blink.c program file.

Browse to the NewTextilesAVR directory, open the code folder and double click the blink.c file to open it in a text editor.

Now we’re ready to start writing our own program… see AVR Programming Tutorial, Part 2: Writing Programs.

« Laser Cutter Tutorial | Readings, Lectures & Tutorials Index | AVR Programming, Part 2 »

« AVR Programming, Part 1 | Readings, Lectures & Tutorials Index

1. Open the blink.c program file.

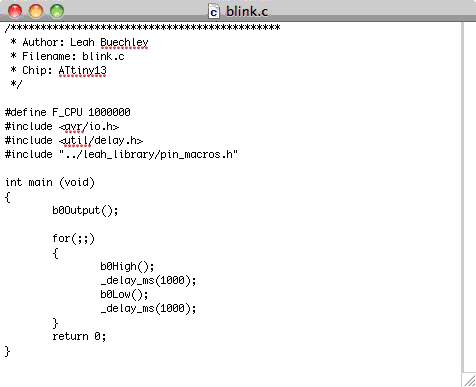
Browse to the NewTextilesAVR directory, open the code folder and double click the blink.c file to open it in a text editor. For Windows, a simple and free editing program is Notepad++. Here’s what my file looks like in the TextEdit application:

The blink.c program file

This program is written in the C programming language.

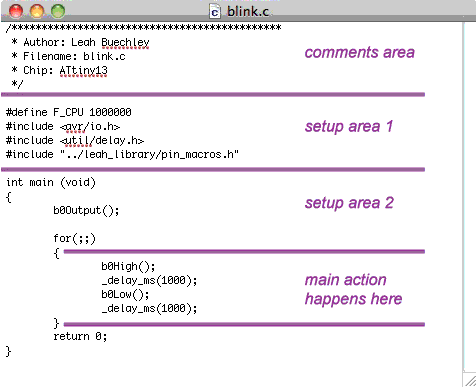
The program is broken up in to a few different regions. Here are the ones we care about:

Functional regions of the blink.c program.

Comments Area

At the top of the page there is a comment section that gives some basic information about the program. This section is ignored by the computer. It’s just there to give us humans some information about the file. In general, a comment is a piece of text that is ignored by the computer. Comments can be anywhere in your program. There are two different ways to create comments:

\* Anything in between a slash and an asterisk and then

an asterisk and a slash, like this statement is a comment *\

OR

\\ A single line of text that follows two slashes like this line is also a comment.

Setup Area 1

This section is where we tell our program what other files it will need and set some basic parameters. We’ll be ignoring this section for now.

Setup Area 2

This section is where we tell our ATtiny13 which legs we’ll be using for which purpose. In our code the line b0Output() tells the ATtiny that an output (like an LED or a motor) will be attached to pin b0. Each pin on the ATtiny13 has a name like b0. To know which pin is which, you can refer to the pin diagram from the ATtiny’s datasheet. Here’s what that looks like:

ATiny13 pinout diagram. (© Atmel.  All rights reserved. This content is excluded from our Creative Commons license. For more information, see http://ocw.mit.edu/fairuse)

Identify pin b0 on the diagram. Notice that in addition to b0 there are b1, b2, b3, b4, and b5. We can use b1-b4 in our programs. We will not be using b5 in any of our programs. We need to do a special kind of programming to use b5.

For every program that you create, you need to include a statement like b0Output() for every pin you would like to use to read information from a switch or to control an output device. Here’s what those statements look like:

b1Output(); this statement sets up pin b1 to control an output like a light or motor

b3Input(); this statement sets up pin b3 to read information from a switch

Main Action Area

This section is where the main action of our program takes place. In this piece of code we have 4 lines:

b0High(); this statement sets pin b0 to 5 volts. For our circuit this turns the LED attached to b0 ON.

_delay_ms(1000); this statement tells the ATtiny to do nothing for 1 second (1000 milliseconds)

b0Low(); this statement sets pin b0 to 0 volts or ground. For our circuit this turns the LED OFF.

_delay_ms(1000); this statement tells the ATtiny to do nothing for 1 second (1000 milliseconds)

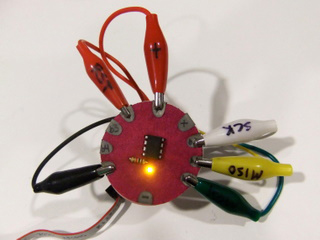
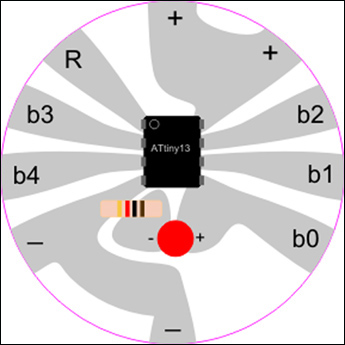
Let’s look at the fabric PCB circuit to see why this piece of code would cause the LED on our board to light up. Here’s what the circuit looks like (view from above):

An example fabric PCB circuit.

Notice how the + side of the LED is attached to b0 and the - side of the LED is attached to ground through a resistor. When b0 is High, at +5V, current runs through the LED, causing it to turn on. When b0 is Low, at 0V, both sides of the LED are attached to ground, so no current flows and the LED turns off.

2. Understanding program structure.

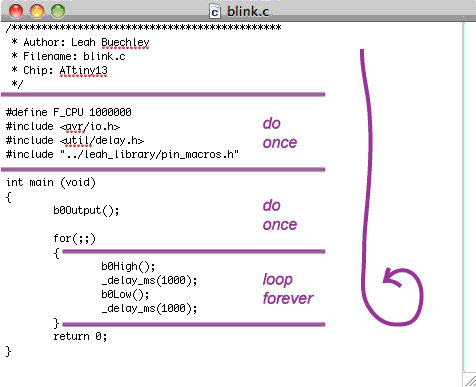
The program is a list of instructions that tell the microcontroller (our ATtiny13) what to do. The ATtiny13 follows the instructions line by line, starting from the top and moving to the bottom. However, when it reaches the “for (;;)” statement, it does what is inside the curly brackets “{” and “}” after the for statement over and over again forever. When it reaches the closing curly bracket “}’” it jumps up to the opening curly bracket and begins again from the top:

Structure of the blink.c program.

3. Edit the code to get the LED to blink at a different speed.

To upload your edited code to your circuit, type the following command in Terminal: make && make install

4. Use alligator clips to attach a second LED to pin b3 and edit the code to get that LED to blink.

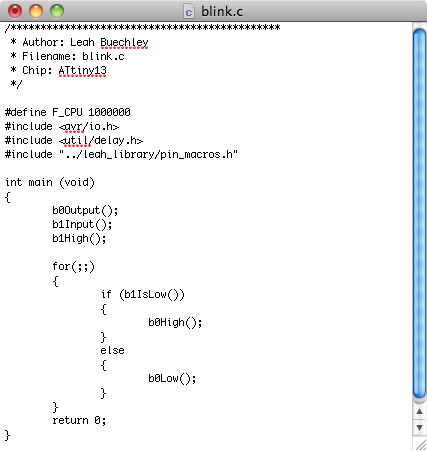
5. Use alligator clips to attach a switch to pin b1 and edit the code so that the LED attached to b0 comes on when the switch is pressed.

Example of edited blink.c program.

For the official AVR C programming language reference see the AVR libc documentation.

« AVR Programming, Part 1 | Readings, Lectures & Tutorials Index

Readings, Lectures & Tutorials Index | Embroidery Machine Tutorial, Part 2 »

We are using the DRAWings4® software package to transform drawings into embroideries for our Bernina Artista 630 Embroidery/Sewing Machine.

1. Create the pattern you are going to embroider

For this example, I wrote a short program in Processing that generates a tree pattern and outputs this pattern as a pdf file.

You can find a beautiful assortment of processing projects (along with their code) on Open Processing.

Here’s my code: randomTree.zip.

You can also use any drawing program that generates vector graphic files to create your pattern.

2. Get your drawing into the right file format

The embroidery machine software can import .ai, .png, and .svg files. I imported my .pdf into CorelDraw and then exported it as a .ai.

3. Open the DRAWings4 software

The icon for the software is on the Desktop of the HLT laptop and desktop machines. IMPORTANT NOTE: the DRAWings software will only work when its companion silver “dongle” is plugged into one of the computer’s USB ports.

4. Create a new embroidery design

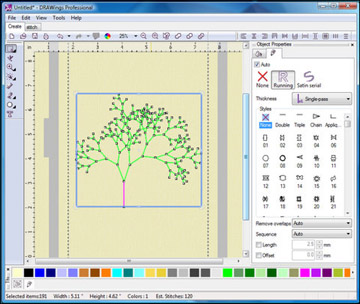
If instructions popup onscreen, simply follow these instructions. Otherwise, go to File->New to create your design. Select your image file and keep the default settings for the rest of the options. If all goes well your window should looks something like this when you’re done:

New embroidery design in DRAWings4. (Courtesy of DRAWstitch Ltd. Used with permission.)

5. Customize your embroidery

Use the menu on the right hand side to edit the stitches in different regions of your drawing.

6. Save your embroidery

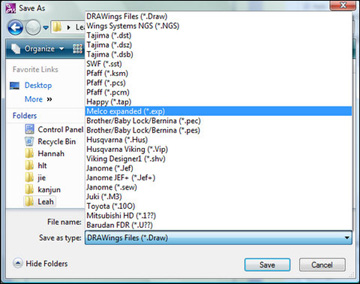
Go to File->Save As and select Melco expanded (*.exp) as the Save as type from the drop down menu. Name your file and save it.

File saving in DRAWings4. (Courtesy of DRAWstitch Ltd. Used with permission.)

7. Copy your file onto a USB stick and bring it to the embroidery machine

Now you’re ready to start working with the embroidery machine itself.  Proceed to Embroidery Machine Tutorial, Part 2.

Readings, Lectures & Tutorials Index | Embroidery Machine Tutorial, Part 2 »

« Embroidery Machine Tutorial, Part 1 | Readings, Lectures & Tutorials Index

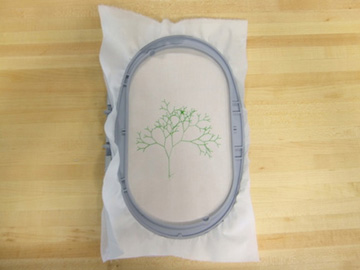
A sample of machine embroidery.

We have a Bernina Artista 630 Embroidery/Sewing Machine. You can also find more information about these steps on page 115 of the Bernina book.

1. Get your supplies together.

  • a piece of non-stretch fabric
  • a piece of interfacing to stiffen the fabric
  • thread for your embroidery

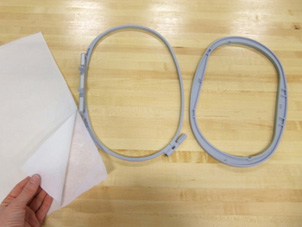
2. Attach your interfacing to your fabric and hoop your material

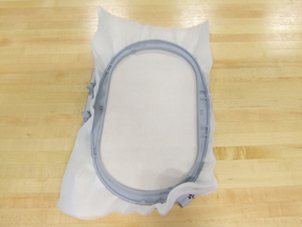
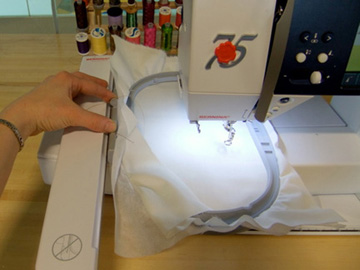
If you’re using an iron-on interfacing, iron the material to your fabric. Put your fabric and interfacing into the embroidery hoop so that the fabric is facing up and flush with the bottom of the hoop.


Putting fabric and interfacing into an embroidery hoop.

3. Set up the machine for embroidery

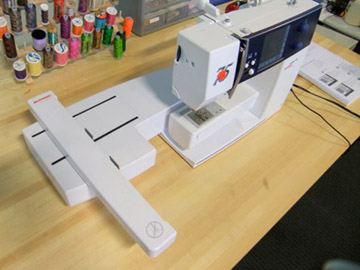
Attach the embroidery arm and plug it into the machine.

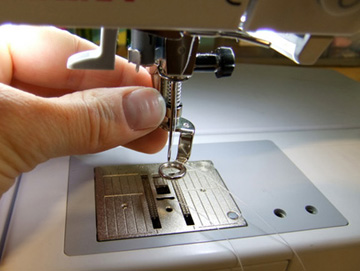
Lower the sewing machine teeth – the “feed dogs” – and attach the embroidery presser foot.

Put your hoop in the machine.

4. Open your pattern

Plug your USB stick into the machine.

Browse to the USB stick and open your pattern.

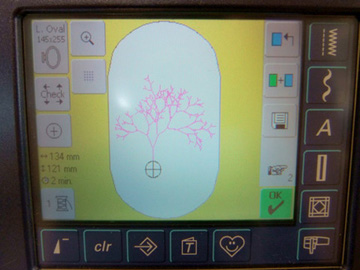
You can use the menu on the machine to scale, move, and rotate your pattern.

When you’re ready hit the OK button.

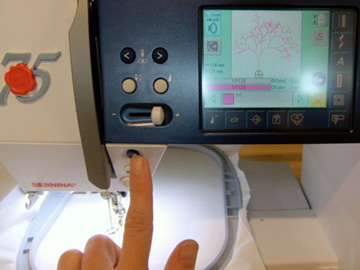
The embroidery machine control menu.

5. Embroider your pattern

Put the presser foot down. Hold down the button with the two dots until the machine starts to stitch.

Finished!

« Embroidery Machine Tutorial, Part 1 | Readings, Lectures & Tutorials Index

Readings, Lectures & Tutorials Index | AVR Programming, Part 1 »

WARNING NOTICE:

The activities described on this page are potentially hazardous and require a high level of safety training, special facilities and equipment, and supervision by appropriate individuals. You bear the sole responsibility, liability, and risk for the implementation of such safety procedures and measures. MIT shall have no responsibility, liability, or risk for the content or implementation of any of the material presented. Legal Notice

We have a Bright Star LG500tt 60 Watt laser cutter.

WARNING: The laser cutter is a powerful, but very dangerous tool. If you use it incorrectly you can poison yourself (and others) and burn down the building. Use it carefully and thoughtfully. In particular: do NOT cut dangerous or unknown materials, and NEVER leave the machine unattended while it is cutting.

1. Create the pattern you are going to cut using a drawing program like Adobe Illustrator

Note: the laser cutter software only recognizes vector lines (the paths of lines). It does not recognize filled shapes or line widths. Here’s a sample file in Adobe Illustrator:

  • ATtiny13FabricPCB.ai (AI)

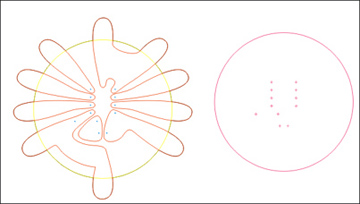
This is for a fabric PCB for the ATtiny13 microcontroller. The drawing includes components for the circuitry and the backing fabric.

Drawing pattern for laser cutter: circuitry and backing fabric.

2. Export your drawing

The laser cutter software can import Illustrator files (version 7.0 only, .ai), HPGL files (.plt), and Drawing Exchange Format files (.dxf). To create a readable file, export your drawing in one of these formats. Save all text as curves.

3. Open the LaserCut 5.1 software

4. Import your drawing

Go to File→Import and select your drawing file.

Alternately, you can open an existing laser cutter file (.ecp). Here is my fabric PCB file in ecp format:

  • ATtiny13FabricPCB.txt (TXT)

(Note: change the extension from .txt to .ecp after downloading. Wiki software does not allow you to upload and post .ecp files.)

5. Get your material ready

Make sure your material is safe to cut.

WARNING: Do not cut anything unless you are positive it is safe!!! Cutting unsafe materials - e.g. PVC, vinyl, or that mysterious plastic you picked up in Chinatown - can cause serious damage to your health and that of those around you. Don’t do it! 

Safe materials include: wood, paper, acrylic, cotton, wool, and silicone.

Unsafe materials include: vinyl, PVC, and any highly reflective material.

Make sure your material fits into the laser cutter. The high-low tech laser bed is 30cm x 50 cm, approximately 12 x 20 inches.

6. Find the proper settings for your material and position your drawing in the software

Choose the appropriate settings for different materials. Note: you can match different colors to different cut/engrave settings within one drawing. The order in which the colors are listed in the software is the order in which they will be cut.

7. Save your .ecp file if you want the layout & cut settings for your drawing saved

8. Turn everything on and home the machine.

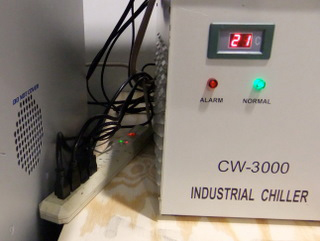
Turn on the power strip that’s to the right of the machine. This turns on the laser cutter, air filter, and cooling system. When everything is on, it’s loud!

Power strip for the laser cutter, air filter, and cooling system.

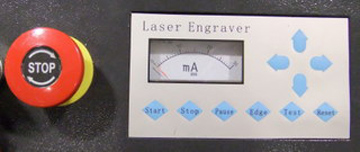
Press the reset button on the machine controls or in the software to home the machine. Note: not homing the machine will result in the machine attempting to cut beyond its boundaries. It’s an important step!

The laser cutter control panel.

9. Focus the laser cutter

WARNING: The risk of fire drastically increases when the laser cutter is not focused properly.

Place your material into the machine.

Use the arrow keys on the machine controls or in the software to move the laser head over your material.

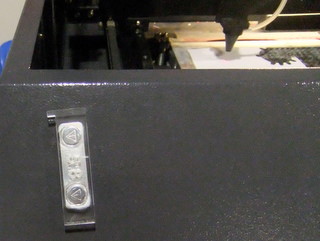
Get the focusing tool, which is magnetically attached to the front of the machine.

The focusing tool, attached to the front of the laser cutter.

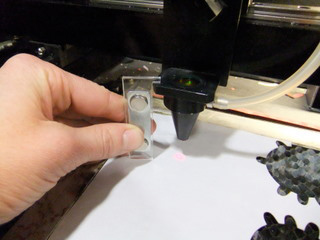
Use the focusing tool and the socket wrench to adjust the height of the bed so that the notch on the focusing tool rests on the plate that is holding the lens. This will focus the laser at the surface of your material.

Adjusting the height of the bed.

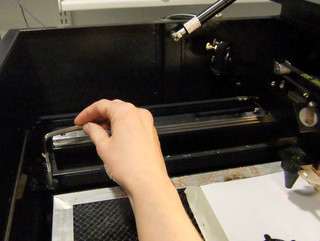
Adjusting the height of the table:

Adjusting the height of the table.

When you’re done focusing, return the focusing tool to the front of the machine and the socket wrench to the platform inside the machine.

10. Cut your part

WARNING: Never leave a running job unattended. You can very easily burn down the building!

To test the boundaries of your cut job, hit the edge button on the machine controls or in the software. This will move the laser cutter head in a square around the perimeter of your job. This is a good way to determine if your drawing and material are properly aligned.

  • Hit start to begin the job.
  • Hit pause to pause the job. Hitting start again will resume the job.
  • Hit stop to stop the job. Hitting start again after you’ve pressed stop will start the job from the beginning. You can also open the lid of the laser cutter to immediately stop cutting.
  • Hitting the big red STOP safety button will immediately turn off the machine.

Readings, Lectures & Tutorials Index | AVR Programming, Part 1 »

Course Info

Instructor
As Taught In
Spring 2010
Level
Learning Resource Types
Other Video
Image Gallery
Projects with Examples
Design Assignments with Examples