
| « Previous: Return to Assignment 9 description | Next: student work sample » |
By Nadia Cheng

Motivation & Overview
The purpose of this work is to explore manufacturing methods and materials for tunable stiffness structures. The motivation is my research, which involves developing mechanisms and novel materials for soft robotics applications.
The work described here is organized as follows:
- Background & objectives
- Steel yarn as a heating element: thermal study
- 2D tunable structures
- 3D tunable structures
- Afterthoughts
Background & Objectives
Wax + foam combination: In past work, I have been experimenting with simple tunable stiffness composites made of widely available materials. Specifically, I have been coating passive scaffolds (like an open-cell, flexible foam) with an active material like wax, which can be thermally activated to transition between liquid and solid states. Such a composite is 1) capable of both passively morphable and rigid, load-bearing states, and 2) self-healing, in that the wax can be heated to mend any cracks in the material.
Objectives for this project: In addition to conducting many mechanical tests on wax-foam composites, I have also tried “integrating” heating elements into the composites by, for example, wrapping a copper wire around a wax-foam beam to locally melt wax via resistive heating. While this has been somewhat successful, I have yet to integrate heating elements into these composite systems in such a seamless way that the mechanical structure and heating element become one. My goal here is develop more sophisticated composites with integrated heating elements.
I have also been limited to using commercial polyurethane foams and flexible 3D-printed structures for the scaffold (or “foam”) portion of the composites. For this project, another goal is to explore a larger material space, including cast materials and traditional textiles.
Steel Yarn as a Heating Element: Thermal Study
Having previously only used solid core metal wires as heating elements, I wanted heating elements that were more flexible and would passively deform with the structure of the composites. Per Prof. Buechley’s suggestion (and thanks to her materials supply!), I investigated the possibility of using 100% stainless steel yarn. This yarn (which is more like a thick, multi-ply thread) is incredible; it’s as pliable as traditional yarns. These steel yarns have been used as heating elements in products such as blankets and car seats.
Because I didn’t have much information about the the electrical or thermal properties of the yarn, I used thermal camera images to determine how hot the yarn would get over time depending on how much current I put through it. The images below show a heating and cooling cycle (1 minute power on, 1 minute power off) of a 4" piece of a stainless steel yarn that was approximately 0.24 mm in diameter. I stretched out the yarn along a table and hooked it up to a power supply, specifying 1 amp as the output current.
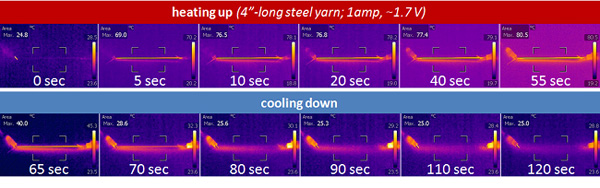
Thermal camera images of a 4" piece of a stainless steel yarn (approximately 0.24 mm in diameter) going through a heating and cooling cycle (1 minute power on, 1 minute power off).
Notice how the temperature rises from room temperature to about 70 deg. Celsius in five seconds, and maintains a relatively steady temperature of about 80 deg. Celsius through 55 seconds. The cooling process is nearly as fast as the heating one, with the temperature dropping about 40 deg. Celsius in the first five seconds. Note: After doing multiple cyclic tests, I found that the temperature-time profiles were not always the same (for both the same piece of yarn and different ones). Sometimes the yarn would reach 90 deg. Celsius, while it would only reach about 70 deg. Celsius and other times. This suggests that the resistance in the yarn might be very sensitive to factors such as the amount it is tensioned or tampered with.
In addition to testing a single piece of yarn, I also wanted to characterize the thermal properties of a piece of yarn embedded in silicone, as I planned to embed the yarn in cast silicone structures. As can be seen in the images below, the heat does not spread quickly within the silicone disc (roughly 2 mm thick); this makes sense because silicone is thermally insulating. Also, the yarn here reaches about 90 deg. Celsius after one minute of applying 1 amp through it. Compared to the temperatures shown in the images above, this suggests that the electrical properties of the yarn are not as consistent as those of a solid core wire.

Thermal camera images of steel yarn embedded in a silicone disc.
2D Tunable Structures
This section describes three main focuses: 1) casting silicone structures with embedded heating elements, 2) integrating heating elements into traditional textiles, and 3) using heating elements to also serve as structural elements (i.e., using the steel yarn as both the scaffold structure and heating elements). I’m starting with 2D structures because, not only are they more simple to deal with than 3D structures are, but controlling a tunable stiffness 2D structure that can be folded into a 3D structure is a challenging and interesting problem to think about.
Casting silicone structures with embedded heating elements
Silicone was selected because it can withstand high temperatures. In the ’nonwoven’ class assignment, I cast a 2D grid made out of silicone. Because that project was quite successful, I thought that making new samples with embedded heating elements would be simple. The images below show the silicone-molding manufacturing process that I used: 1) laser cut positive acrylic molds, 2) place acrylic molds onto a vinyl adhesive backing and pour a curable polyurethane into the acrylic molds to make a flexible, reusable negative mold, 3) remove cured molds from vinyl backing, 4) remove polyurethane molds from acrylic molds, and 5) prepare polyurethane molds for casting silicone by lining and taping down steel yarn for embedded heating elements.

The silicone-moulding manufacturing process.
To my great disappointment, the silicone would not cure properly in the polyurethane molds; any surface of the silicone that touched the molds turned out very greasy and slimy, weakening the overall structure. I Initially thought that I had made a mistake by using mold release in the acrylic-polyurethane molding process, leaving mold release on the polyurethane that would interact poorly with the silicone. Therefore, I molded a second set of polyurethane molds (without using any mold release), and the cast silicone was still not cast properly with the same defects.
Not knowing what the issue was, I decided to make other types of negative molds, shown below. In addition to 3D printed molds and wax, I also tried using clay and a power-based molding material. As with the polyurethane, the silicone did not cure properly in the 3D-printed molds (most likely due to an adverse chemical reaction with a glossy residue on the printed materials), or the power-based mold. The wax molds were too difficult to make because I couldn’t remove them from the acrylic molds, and the clay was difficult to work with.
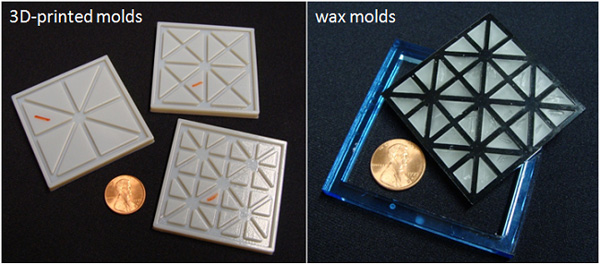
Samples of 3D-printed molds and wax molds.
I ended up salvaging the cast silicone from multiple polyurethane molds; I had to wash and pat down the silicone until it was no longer too slimy (for lack of a better word) to work with. In addition to trying multiple manufacturing processes (which was not originally intended), I also cast silicone grids with triangle patterns, as they resemble common folding patterns. I cast grids with different sized triangles (shown below, with no heating elements) to experiment with structures with different stiffnesses. For example, my goal was to create a 2D structure that could remain stiff with the rigid wax coating but could deform under its own weight when heating elements were activated.
More samples of cast silicone grids with varying patterns.
The images below show cast silicone grids with embedded steel yarn as heating elements.
Cast silicone grids with embedded steel yarn as heating elements.
The video below shows an experiment that I did with a silicone grid, dipped in wax, with one heating element running through it. The purpose was to see if I could soften the part of the structure that the heating element runs through to activate a folding line; the goal was the have the structure fold only along this line, under its own weight.
Tunable Stiffness Structures: silicone in wax.
The video shows me actively bending the structure with my hands. After I visibly noticed the wax melting, the structure did not look like it was going to deform under its own weight (or at least not any time soon, and I was getting impatient after 1 minute!). Therefore, while it looks like I’m forcefully bending the structure, I was actually softly bending it; the structure had indeed gotten much softer along the heating line.
I think this experiment was not completely successful for various reasons. For one, silicone is a thermally insulated material so it might take a while for the heat to reach the surface of the wax. Also, the geometry of the structure might not have been appropriate for it to deform the way I wanted it to. Unfortunately, I had to spend a lot of time manufacturing the silicone structures rather than experimenting with various geometries. Future work involves addresses this latter issue.
Integrating heating elements into traditional textiles
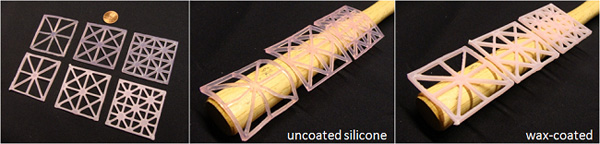
In addition to casting non-traditional textiles, I thought it would also be interesting to integrate the steel yarn into more traditional fabrics. It was especially convenient to have the steel yarn because I could easily stitch them into the materials via sewing. The images below show three existing textiles with the steel yarn stitched into them. For the crocheted wool and the muslin, the images show both uncoated and wax-coated samples.
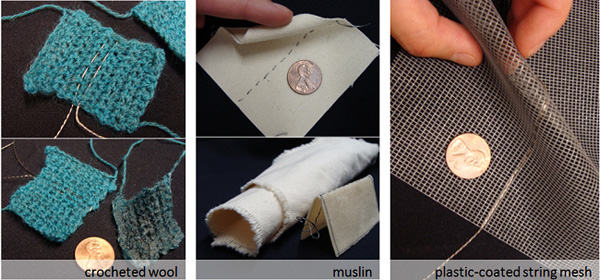
Integrating steel yarn heating elements into fabrics.
I was very surprised by how stiff the wool and muslin became after dipping them in a molten wax bath. These materials also have great wicking compatibility with the wax; I literally just had to dip them in the wax and they would quickly become saturated with liquid.
Below is a video of a muslin sheet made rigid by dipping it in wax. The sheet has one line of steel yarn stitched across it where the fold is made. I was hoping that the material would deform under its own weight when the heating element was activated, but I had to add a 50 gram mass to it to make it unfold at a reasonable speed. In general, I’m extremely pleased with how this demonstration worked out.
Tunable Stiffness Structures: muslin in wax.
Using heating elements to also serve as structural elements
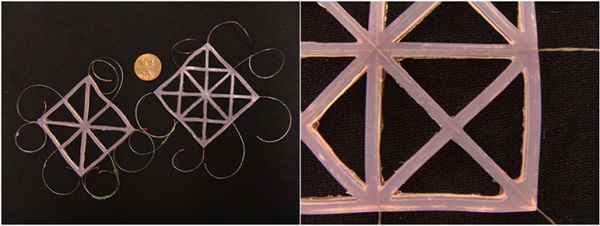
If using traditional textiles as structural elements proved to be successful, then making a textile out of something like the stainless steel yarn should also yield decent results. However, the primary challenge in working with the stainless steel yarn is that it is not electrically insulated, so the electrical paths would have to be carefully constructed in a complex structure like a textile. The images below show some simple configurations in which the steel yarn might be laid out in to create a 2D network. Rather than electrically insulating all exposed surfaces of the steel yarn, I put a node of silicone at each point where two pieces of the steel yarn intersected each other; the silicone electrically isolated intersecting paths. The rightmost images show the extreme case, in which a single layer of silicone was cast between orthogonal steel yarn paths.
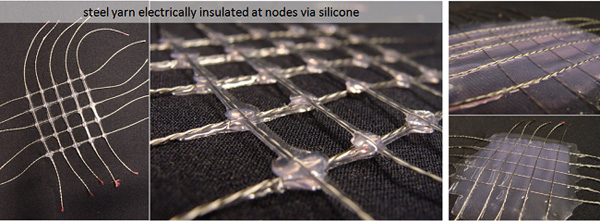
Creating a 2D heating element network from a grid of steel yarn.
The video below is a proof-of-concept to demonstrate how the steel yarn might be doubled as a structural element and a heating element. The video shows a piece of steel yarn that was dipped in wax and formed into a coiled shape before the wax had solidified. Once electrical current is run through the steel yarn, it immediately collapses to its natural shape. I thought this was really neat!
Tunable Stiffness Structures: steel yarn in wax.
3D Tunable Structures
Below is a 3D unit cell of a simple lattice made out of flexible, open-cell polyurethane foam. Each strut is a piece of foam with a piece of stainless steel yarn stitched through it so that each strut can be individually thermally activated.
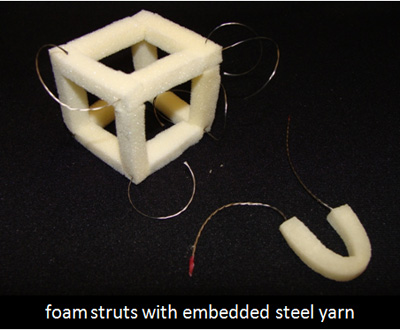
A 3D tunable structure made of foam.
The “U”-shaped strut in the lower right in an individual strut that was dipped in wax and cooled in this shape. I ran a test to see if this strut would restore its natural, straight shape (because of the “shape memory” of the foam) by running current through the steel yarn to soften the wax, but after two minutes of seeing that nothing had happened, I concluded that my current design was not reasonable. I also could not visibly see that the wax was melting as the steel was heating up. This is most likely because the foam is inherently thermally insulating, so it would take a significant time for the heat to spread to the outer surface of the composite. In future iterations, I need to scale the design so that the steel yarn is only slightly thinner than the foam strut to increase the surface area to volume ratio.
Afterthoughts
As it typically is with research, many of my tests and experiments presented here lead me to more unanswered questions and possibilities for improvements. However, I greatly appreciate how this project gave me an especially creative space for exploring materials; I found myself frequently coming up with more ideas for things to try (for instance, I did not initially plan on integrating heating elements into traditional textiles, but look at the awesome results I got!). In a way, this project got me really excited about my research because it helped me see how I can use my crafting interests and creativity to benefit my technical work; it’s always great to be reminded that these things are not always mutually exclusive! This last point is true for my experience throughout the New Textiles class; I felt like I was always doing things I would do for fun outside of my technical work rather than doing work for a class. I’m going to miss it!
| « Previous: Return to Assignment 9 description | Next: student work sample » |


