
| « Previous: student work sample | Next: student work sample » |
By Xiao Xiao and Elena Jessop
Motivation
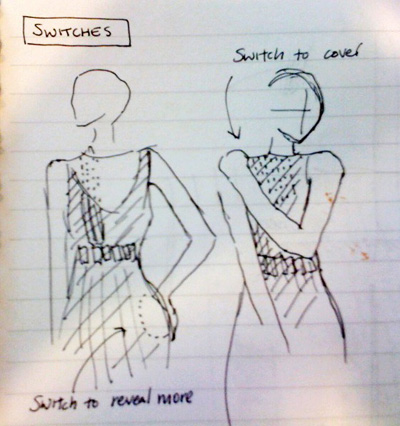
Every woman is supposed to have at least one iconic “little black dress” – the piece that goes with everything and can be worn for many different occasions. However, while you can accessorize your little black dress in many ways, it is limited by its basic construction. What if you could change the shape of your little black dress on command? What if you could make your outfit more or less revealing…lower the neckline, create a scoop in the back, a slit up the thigh?
For this final project, we were interested in constructing a garment had an output mechanism other than lighting, and settled on exploring what we could do with thermochromic ink. In particular, we were interested in the fact that the ink transitions from colored to clear…but none of the prior work we explored took advantage of the transparency to create objects that seemed to be sheer. What if panels of a dress were made of sheer fabric printed with thermochromic ink, so that they appeared opaque in normal wear, but could be heated to become sheer?
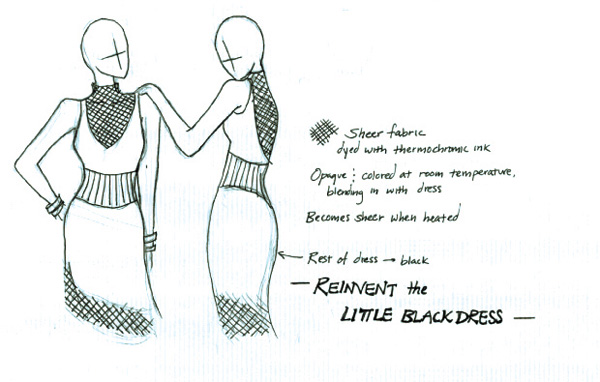
Reinventing the Little Black Dress.
Construction
Our original design had sheer panels that could be turned on to turn a fairly conservative garment (based on a 1960’s pattern) into a dress with a v-neck, a lowered back, and a slit up the thigh. For purposes of construction time and amount of power needed, we settled on implementing the v-neck for this prototype.
We got nude-colored sheer fabric and dyed it with a mix of thermochromic ink powder (from ColorChange) and fabric medium. We used a paint roller coated in the ink/fabric medium mix to create an even coating on the fabric, as earlier experiments with a paintbrush resulted in visibly uneven coverage. We chose a thermochromic ink that started out black and became clear at 40 degrees Celsius, a bit above body temperature, so that simply wearing the garment would not cause panels to change to transparent.
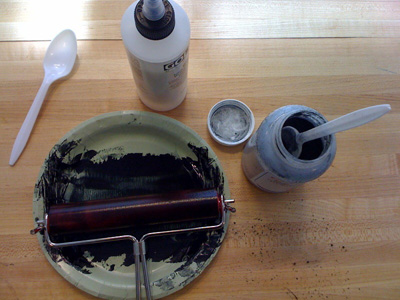
Preparing the thermochromic ink.
We used resistive heating through stainless steel yarn to change the color of the dress, sewing the yarn in pinstripes through the sheer portions. We figured out through testing that 6 volts can heat ~16" conductive yarn sewn through the fabric enough to change the color of 1/4" of fabric around the yarn. In order to get enough current through the dress, we connected each pair of loops to a transistor that could be controlled by an on-board microcontroller.
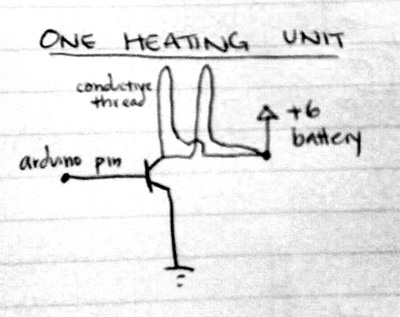
The resistive heating unit.
To power the dress, we used 6 packs of 4-pack AA batteries, which provides 6 volts each. Using lithium-ion batteries would have been preferable, but due to lack of budget, we pursued a less expensive option for this prototype.We connected two loops of conductive yarn to each battery pack, which effectively heats up an area of about 1"x7". For modularity, we designed the dress such that all the power is connected to a removable belt, which can snap on to the dress. The metal snaps serve as both conductive joints in our circuit and to secure the belt to the dress. The modular design allows us to reuse all of our heating circuitry if we decide to use a different type of battery to power the dress.
One major limitation of the thermochromic ink technique was the amount of power necessary for turning a relatively small area transparent. This was made more power-intensive by the high temperature required for the color change and the fairly light sheer material, which did not conduct heat very well.
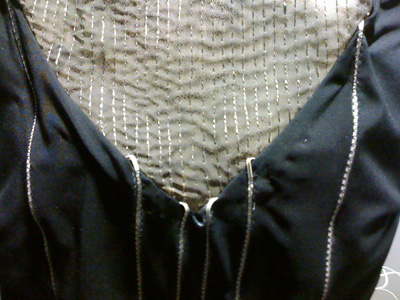
The thermochromic area of the dress.
To allow the garment to be controlled by the wearer, we incorporated soft pressure sensors in the right hip and left shoulder of the dress. Putting your hand on your hip turns the circuit on and causes the neck piece to become transparent, so the dress transforms from a boatneck to a low v-neck; putting your hand across your body to your shoulder turns the circuit off, so the neck piece gradually fades back to opaque. The circuit also times out and turns off 25 seconds after it is turned on.
Controlling the dress.
Each soft pressure sensor is constructed from two layers of soft and slightly spongy fabric such as felt or velvet, with a layer of netting sandwiched in the middle. On each square of felt, conductive thread is used as a bobbin thread to stitch a number of zigzag lines across the felt. These layers are isolated from one another by the netting, until the sensor is pressed. Then it completes the circuit and behaves as a switch.
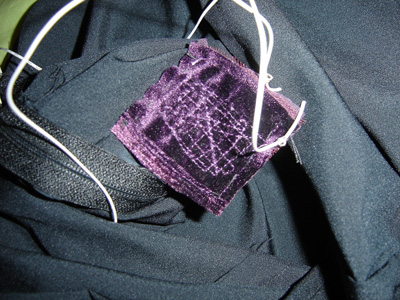
One of the soft pressure sensors.
The Final Dress
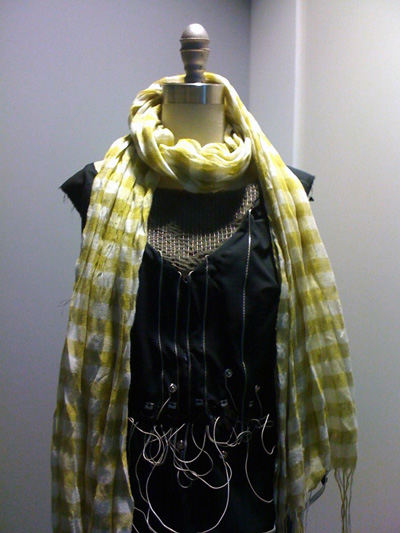
The final dress.
The dress in action.
Techniques developed
As we were using resistive heating with the stainless steel thread, we wanted the connection between the batteries and the steel thread to have as low a resistance as possible to not require additional current. Thus, we chose to use flexible insulated wire taken from ribbon cable. In our attempts to connect the soft steel thread to the ribbon cable, we found that piercing the insulation of the flexible multi-stranded wire with a needle and pulling the steel thread through a couple of times created a fairly strong and robust connection. We had a few weak connections after coating the knots on the thread with nail polish, which may have seeped down the thread and into the connection, but this could be fixed by using crimp beads or other methods to finish the edges of the steel thread.
Additionally, we created a belt to hold the battery packs that could snap on and off. We used snaps that could be hammered in for stability, but were not able to sew to these snaps. We found that wrapping the end of a stripped ribbon cable several times around the snap and twisting the free end to the main part of the wire created a firm connection.
We similarly wrapped stripped stranded wires around the legs of the transistors, which we curled into circles. We experimented with sewing the stripped ends of the stranded wire through the fabric, which also proved useful (particularly for the wires attached to the pressure sensors, which ran inside the garment but then needed to be connected on the outside of the dress).
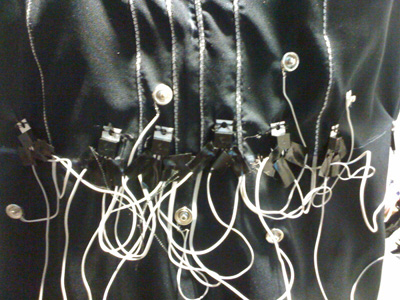
Wiring for the dress.
Lessons Learned
An important thing we found in constructing this dress was that transistors can be quite fragile, and it is very important to include resistors or a load of some kind on the connection to the base pins to prevent short-circuiting and damaging the transistors.
We also found that modularity of the components was a good design pattern for working with textiles. For example, as we created the battery belt separately, with snaps to connect the power and ground to the dress, it would be easy to create a new belt with lithium batteries and a much lighter form factor and simply be able to snap that on without making other changes to the garment.
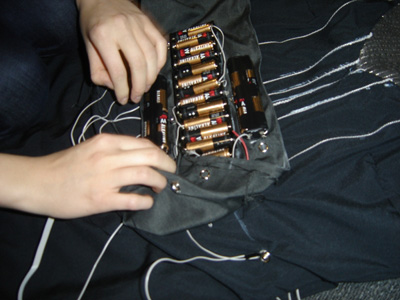
The battery belt.
Finally, it is interesting to reflect on the difference in mindset when working on a textiles electronics project versus a traditional electronics project. Working with textile electronics gives people the impression that they are working with handicrafts and not “hard engineering”. When working on our project, we found ourselves treating it more like a craft project than actual circuitry. We were less rigorous than perhaps we should have been with making sure our connections are robust and we did not test our work as much throughout the process (something that got us into trouble several times). While idea of crafting lowers the entrance barrier of working with electronics– people are less intimidated and perceive projects to be less difficult– it also inadvertently causes people to be less careful. The lesson for us from all this is that in the future, we will make sure to be more meticulous with our work, to test early, often, and to completion. A bigger lesson and an idea to explore in the future is how to encourage people who are starting out in e-textiles to maintain a methodical approach to soft-circuit design and building.
| « Previous: student work sample | Next: student work sample » |


