
Readings, Lectures & Tutorials Index | Embroidery Machine Tutorial, Part 2 »
We are using the DRAWings4® software package to transform drawings into embroideries for our Bernina Artista 630 Embroidery/Sewing Machine.
1. Create the pattern you are going to embroider
For this example, I wrote a short program in Processing that generates a tree pattern and outputs this pattern as a pdf file.
You can find a beautiful assortment of processing projects (along with their code) on Open Processing.
Here’s my code: randomTree.zip. (Note: this code is no longer available.)
You can also use any drawing program that generates vector graphic files to create your pattern.
2. Get your drawing into the right file format
The embroidery machine software can import .ai, .png, and .svg files. I imported my .pdf into CorelDraw and then exported it as a .ai.
3. Open the DRAWings4 software
The icon for the software is on the Desktop of the HLT laptop and desktop machines. IMPORTANT NOTE: the DRAWings software will only work when its companion silver “dongle” is plugged into one of the computer’s USB ports.
4. Create a new embroidery design
If instructions popup onscreen, simply follow these instructions. Otherwise, go to File->New to create your design. Select your image file and keep the default settings for the rest of the options. If all goes well your window should looks something like this when you’re done:
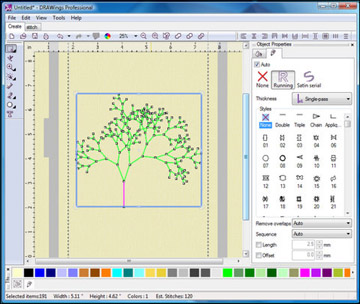
New embroidery design in DRAWings4. (Courtesy of DRAWstitch Ltd. Used with permission.)
5. Customize your embroidery
Use the menu on the right hand side to edit the stitches in different regions of your drawing.
6. Save your embroidery
Go to File->Save As and select Melco expanded (*.exp) as the Save as type from the drop down menu. Name your file and save it.
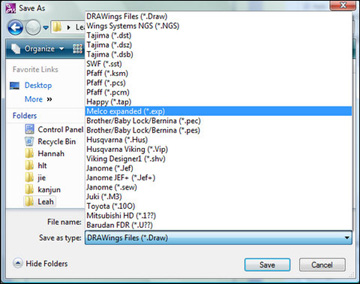
File saving in DRAWings4. (Courtesy of DRAWstitch Ltd. Used with permission.)
7. Copy your file onto a USB stick and bring it to the embroidery machine
Now you’re ready to start working with the embroidery machine itself. Proceed to Embroidery Machine Tutorial, Part 2.
Readings, Lectures & Tutorials Index | Embroidery Machine Tutorial, Part 2 »


